Good Mid-Tower Option?
Review Summary
The Thermaltake Versa J24 TG RGB is an ideal chassis for mid-range budget users who would want a nice blend of Tempered glass with mesh paneling backed by built-in RGB fans with a dedicated controller which can also be connected to the motherboard lighting solution and good enough cooling potential. It is a plus that this chassis comes with 4x 120mm fans pre-installed, with three of them being RGB versions.
Overall
-
Build Quality - 9/10
9/10
-
Features - 9/10
9/10
-
Design - 9/10
9/10
-
Cooling Provision - 9/10
9/10
Pros
- Budget-friendly
- Good airflow
- Pre-installed RGB fans
- Good storage options
- Easy PSU installation
Cons
- Difficult GPU installation
- No provision for a top radiator
- Hard to put back the PSU dust filter
- No markings for motherboard sizes
- Single fan header provided
Thermaltake was founded in 1999 with the vision of building Thermaltake Technology into “a cultural brand for the enjoyment of entertainment, e-Sports, technology, and lifestyle”. Thermaltake Technology is focused on delivering the perfect user experience. Their products range from Power Supply Units, PC Chassis, Complete Custom Loop solutions, CPU Coolers, and Fans to a range of the peripherals like keyboards, mice, mouse mats, headphones, and even gaming chairs. The very essence of the Thermaltake DNA is based on Courage, Passion, and Perseverance.
Today, I will be taking a look at their Versa J24 TG RGB edition. This chassis is available in three edition versions which are Versa J24 TG, Versa J24 TG RGB, and Versa J24 TG ARGB. This is a compact, mid-tower chassis from the Thermaltake, and I really like what they did with the design. It is a no-frill, no-nonsense design rather they have focused on functionality here. This chassis can accommodate up to full ATX size motherboards, a PSU of maximum length 160mm, up to 360mm radiator on the front side, and a 120mm radiator on the rear.
Up to three 3.5” HDDs or 2.5” SSDs in a drive cage or a combination of them in addition to two 2.5” SSD on dedicated brackets, the maximum length of the CPU cooler is 160mm, and of the graphics card is 330mm. In terms of fan support, the user can install up to 3 120mm or two 140mm on the front side, up to 2 120/140mm on the top, and 120mm on the rear. This chassis has a PSU shroud which is ventilated and has two 2.5” SSD brackets up top.
The HDD cage can be mounted on two pre-drilled locations across its length but is non-removable. This chassis has a 4mm TG side panel on the left side only. For RGB goodness, this chassis has three 120mm RGB fans for which the controller is provided on the top I/O panel. The user can also sync them to the motherboard lighting solution like AURA Sync from Asus, for example. There is a non-RGB 120mm pre-installed on the rear. In terms of the cooling solution, Thermaltake has gone to lengths to save bucks for the users as they certainly would not need any more fans for this chassis.
Specifications

Packaging and Unboxing
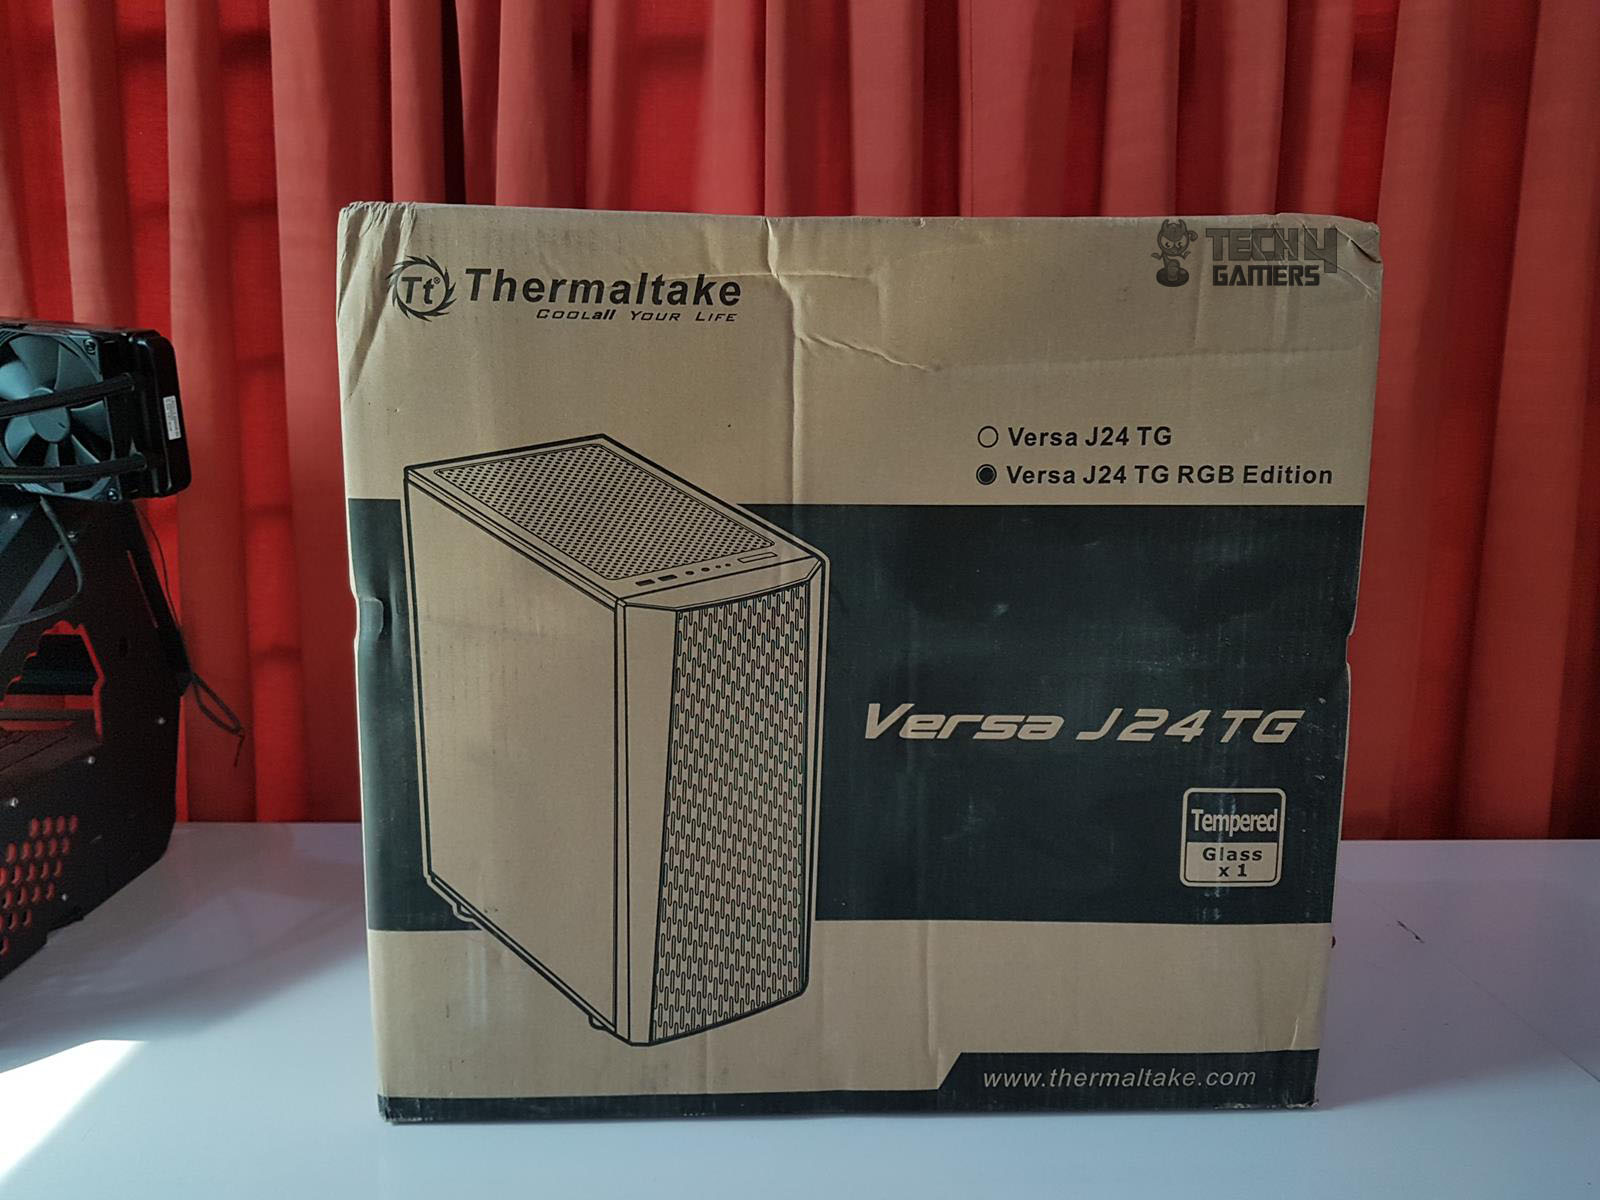
The chassis is shipped inside a standard brown color cardboard box. The front side has a Thermaltake brand logo and name printed on the top left. Being a budget chassis, we are not seeing their TT Premium logo here. A diagram of the chassis is printed on the left side with Versa J24 TG RGB selected out of two written options. Tempered Glass x1 is printed on the bottom right. The backside also has an identical layout.
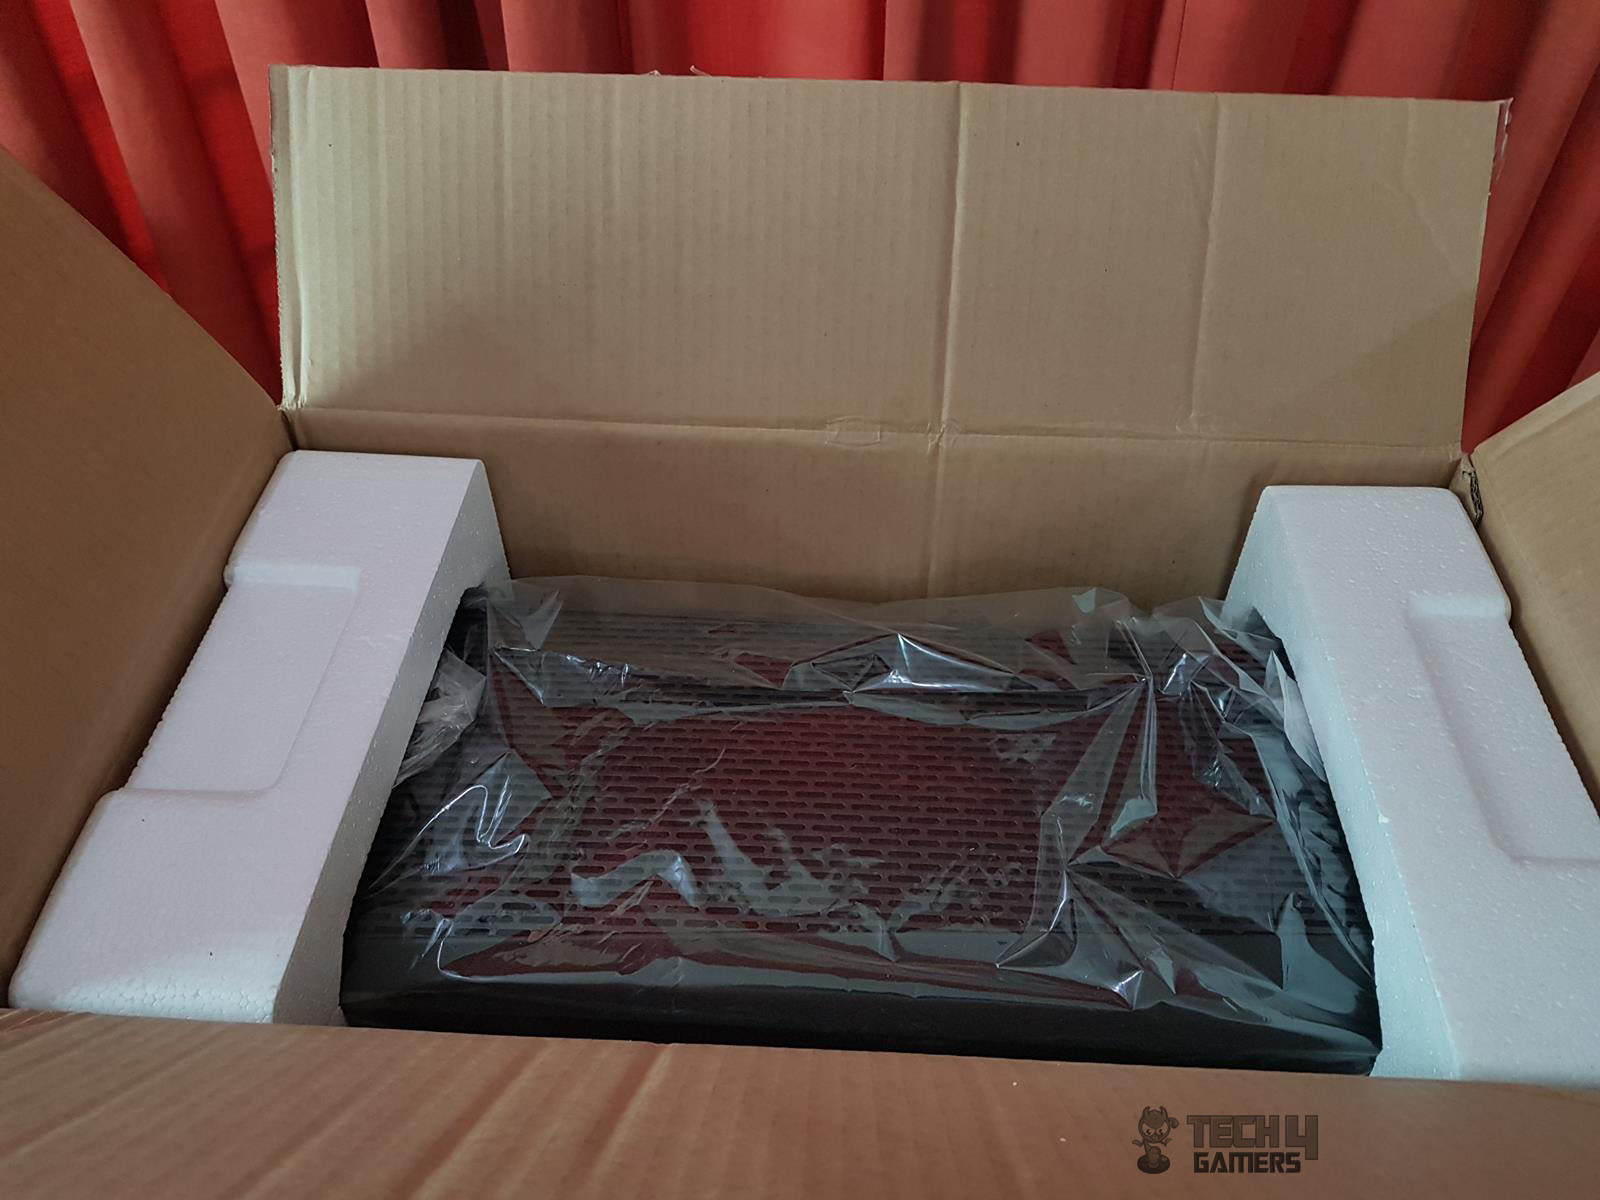
Opening the box will show the chassis is tucked inside two thick Styrofoam pads of white color.
Accessories
The following are provided:
- 8x 6-32x6mm Screws for Power Supply
- 17x 6-32mm Screws for motherboard/3.5” HDD
- 16x M3x5mm Screws for 2.5” SSD
- 12x T5x10mm Screws for fans
- 8x 6-32x30mm Screws for fans
- 6x Cable ties
- 1x PSU Holder
- 1x Speaker
- 1x User Guide
Closer Look
Versa J24 TG RGB is a compact mid-tower chassis with a spacious layout and a good amount of cooling and storage provision. It is a perfect mix of Tempered Glass and perforated design to bring the best looking optimally performing chassis at the users’ discretion out of the box.
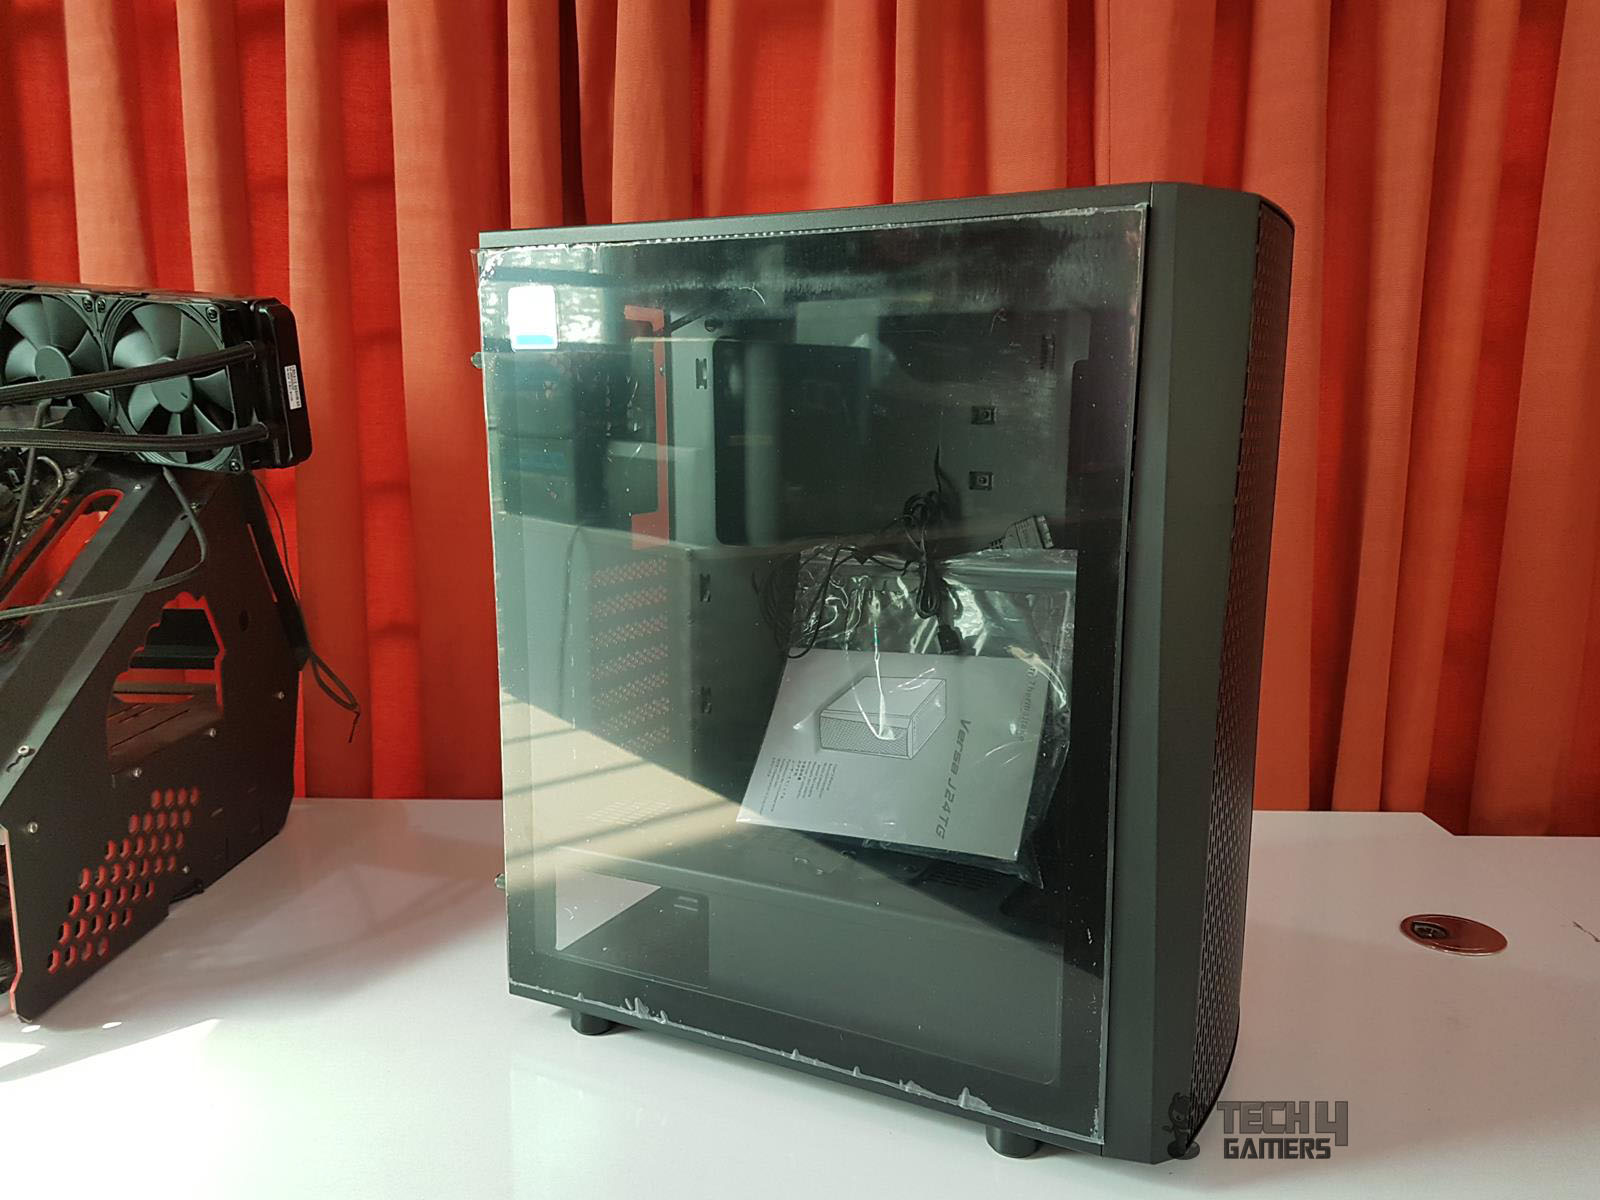
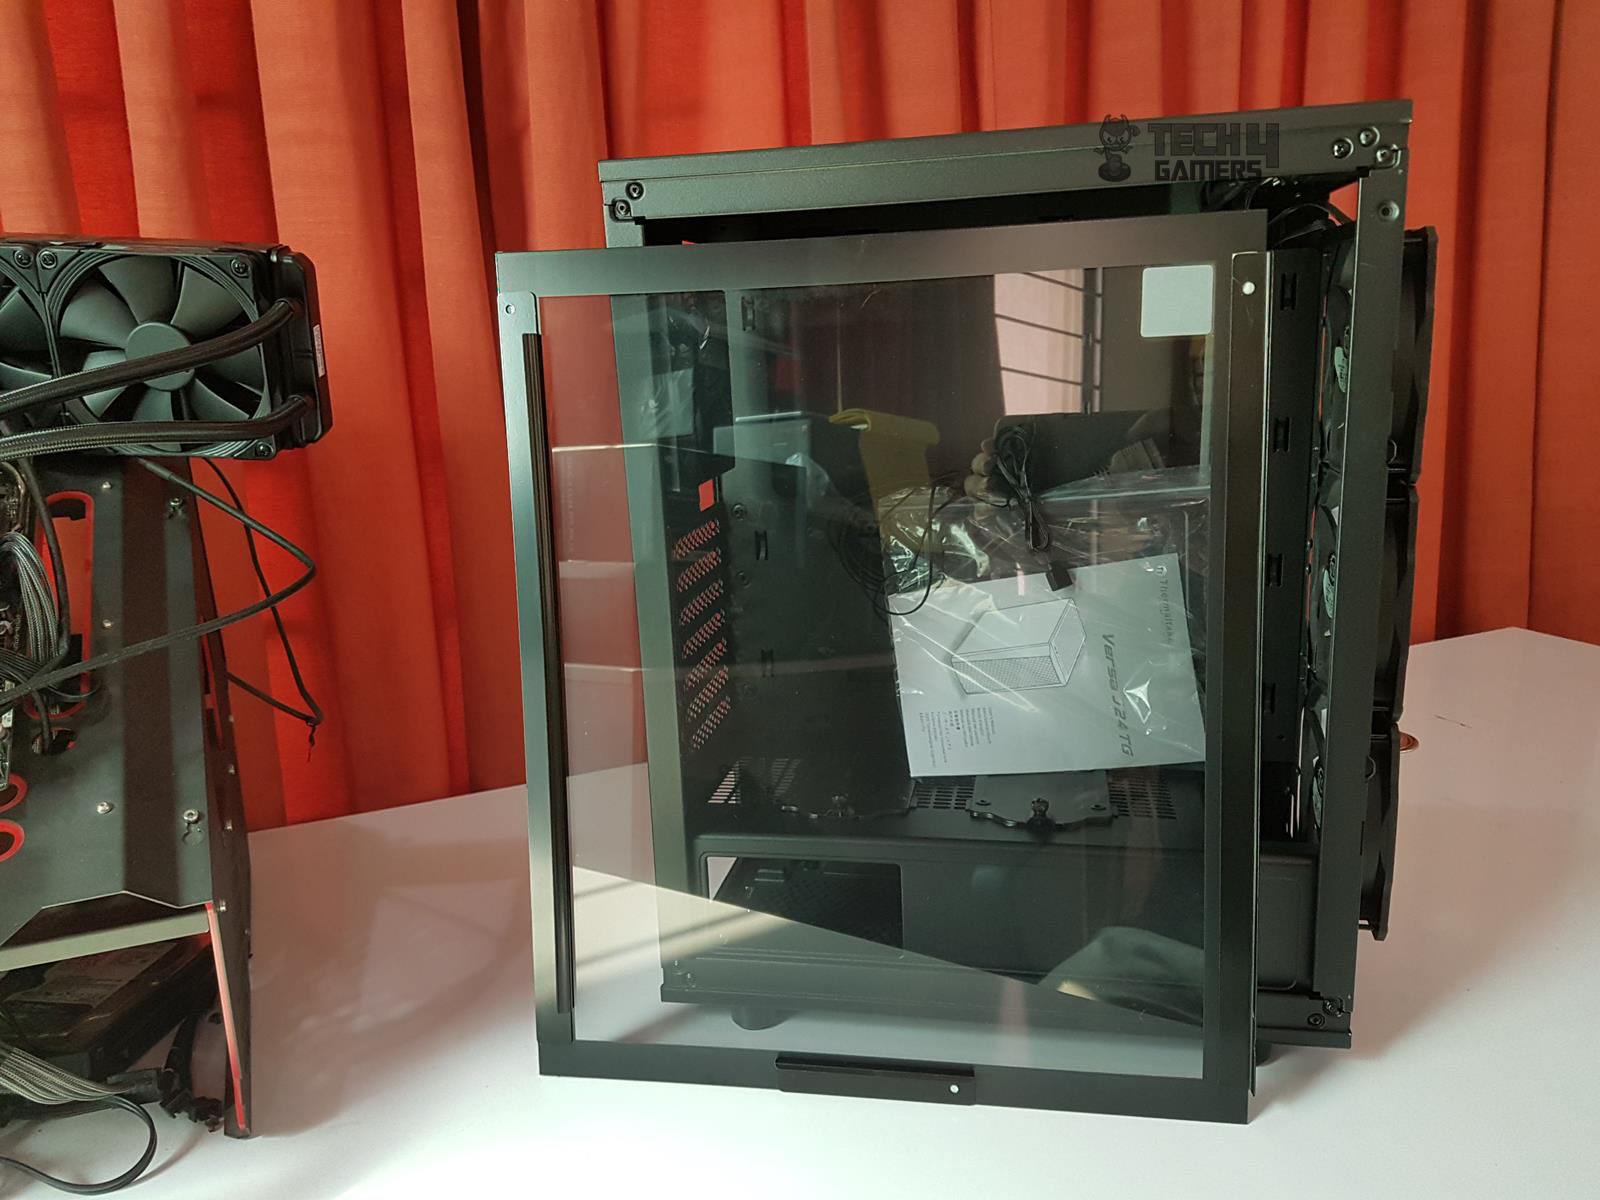
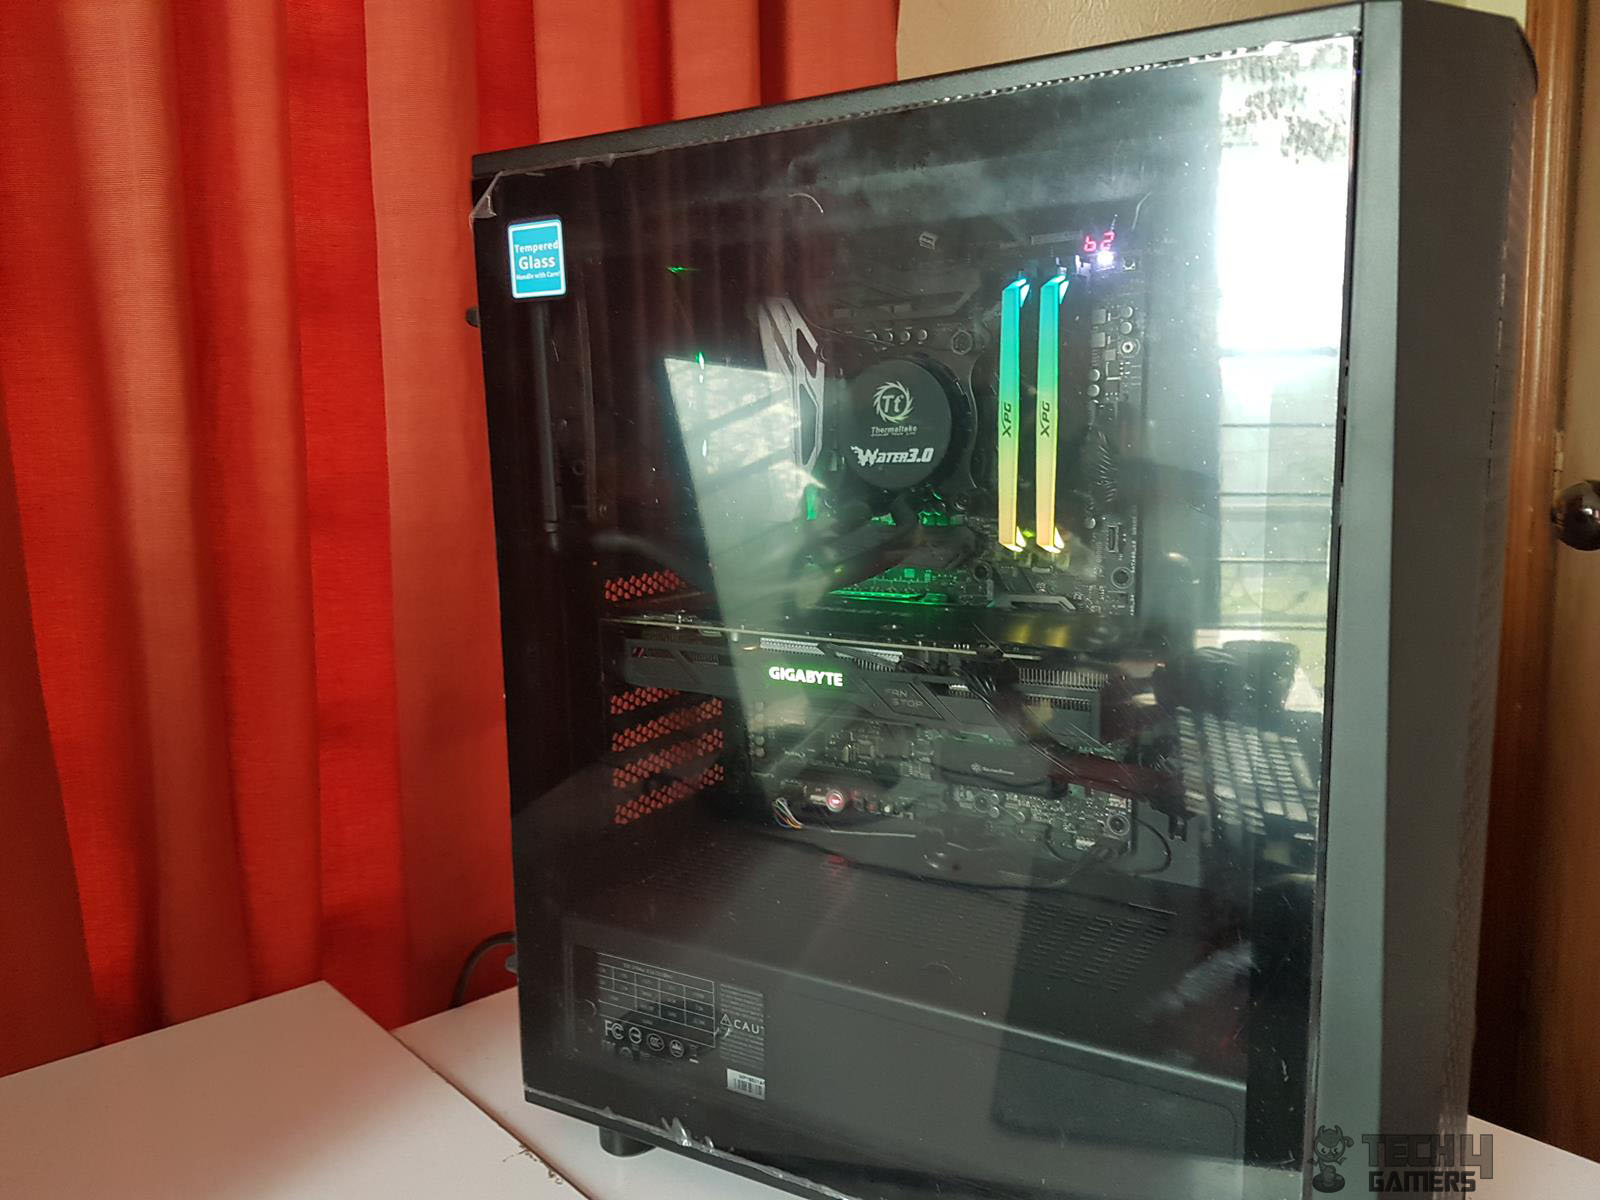
It is time to dig into the design elements of this chassis. The dimension of the chassis is 462x206x414mm. It is made of SPCC material and weighs 6.2kg. The exterior and interior are black in color. Let’s start with the exterior of the chassis. The chassis comes with a TG panel preinstalled on the left side. The tempered glass has a dimension of 553x421x4mm.
It has quite an odd implementation, though, as the holding brackets are pasted on the interior side of the glass panel using adhesive tape. The glass does not fully flush against the frame of the chassis due to this particular design. The right side panel is a solid one without any branding or design.

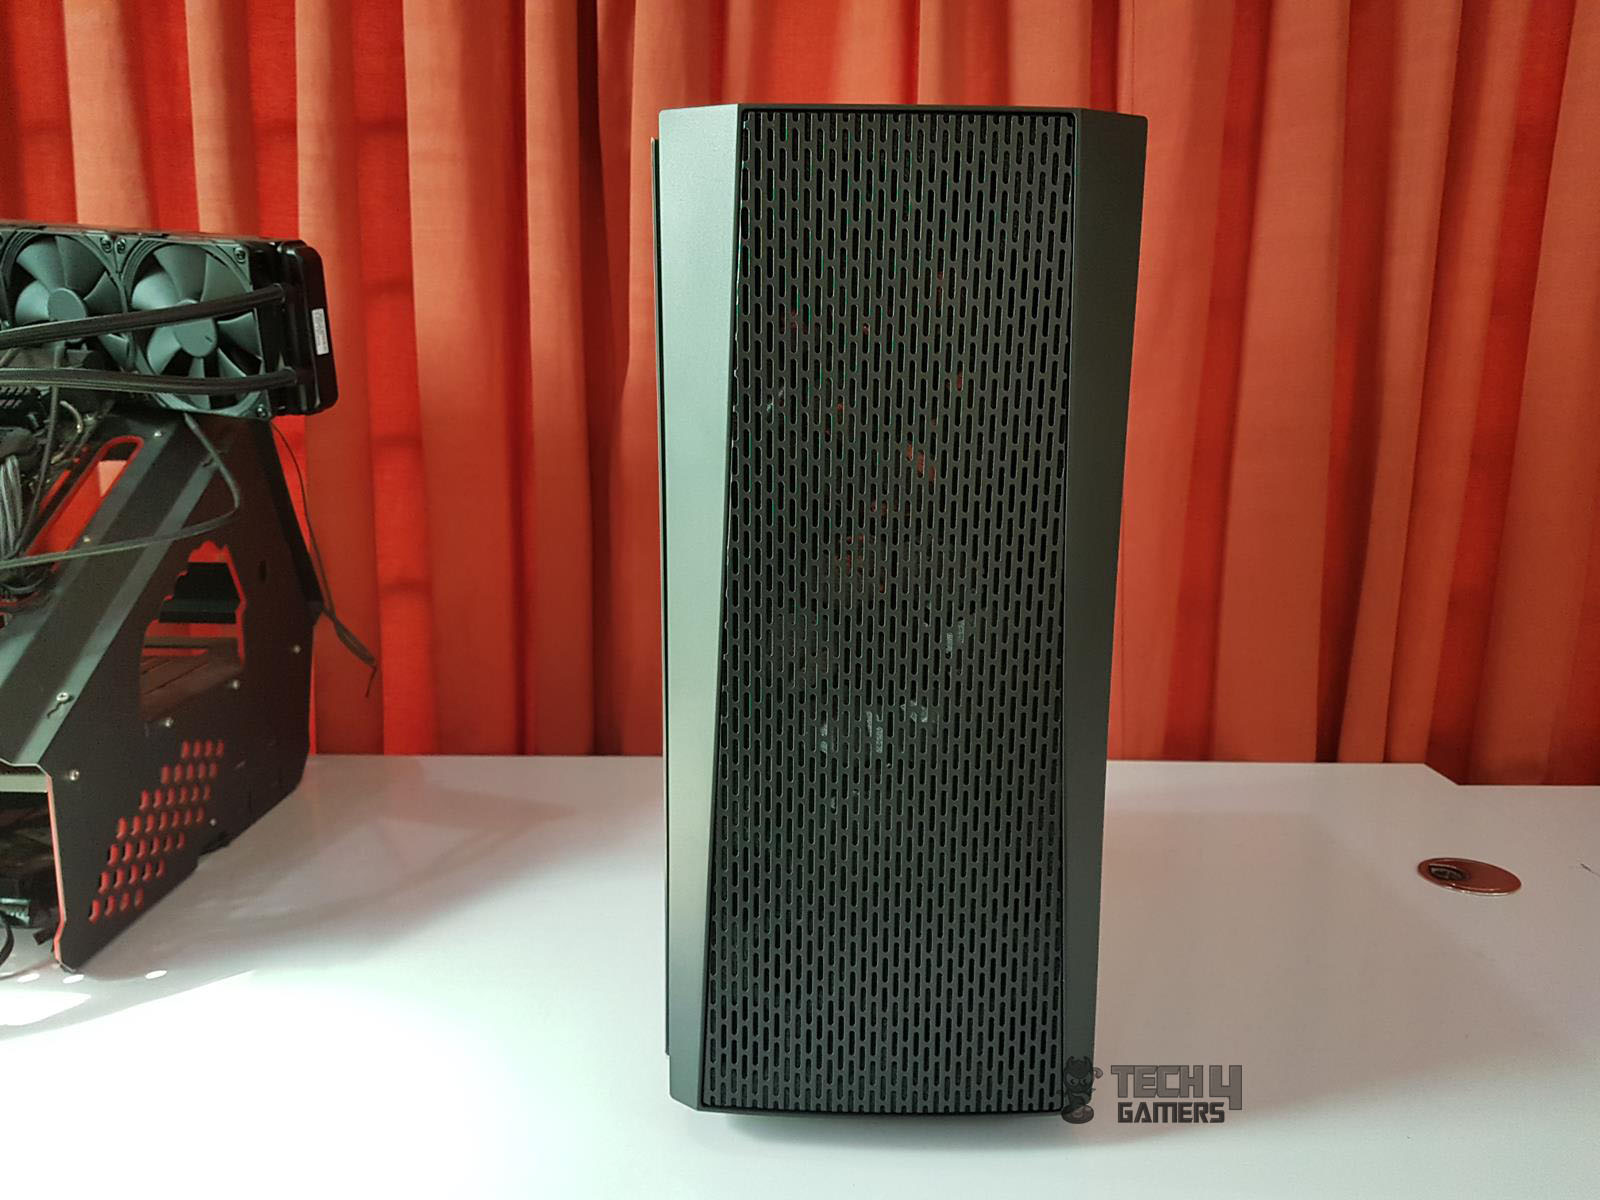
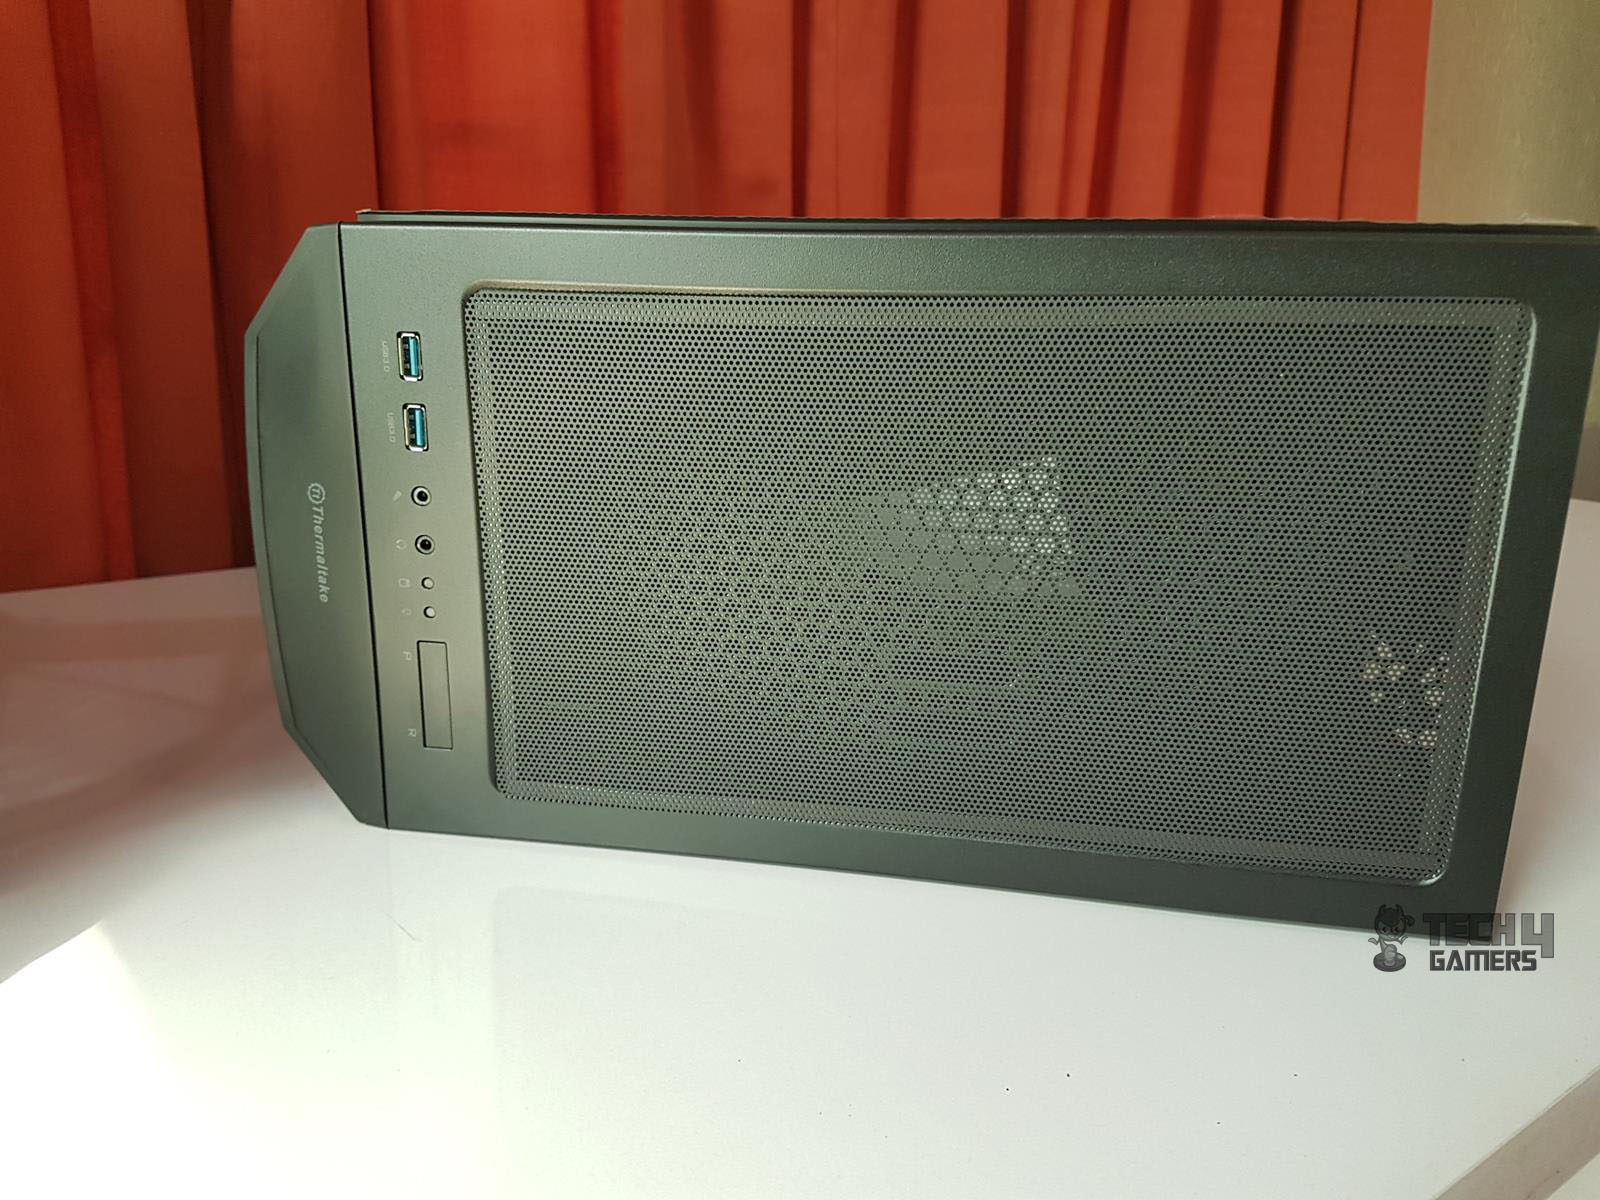
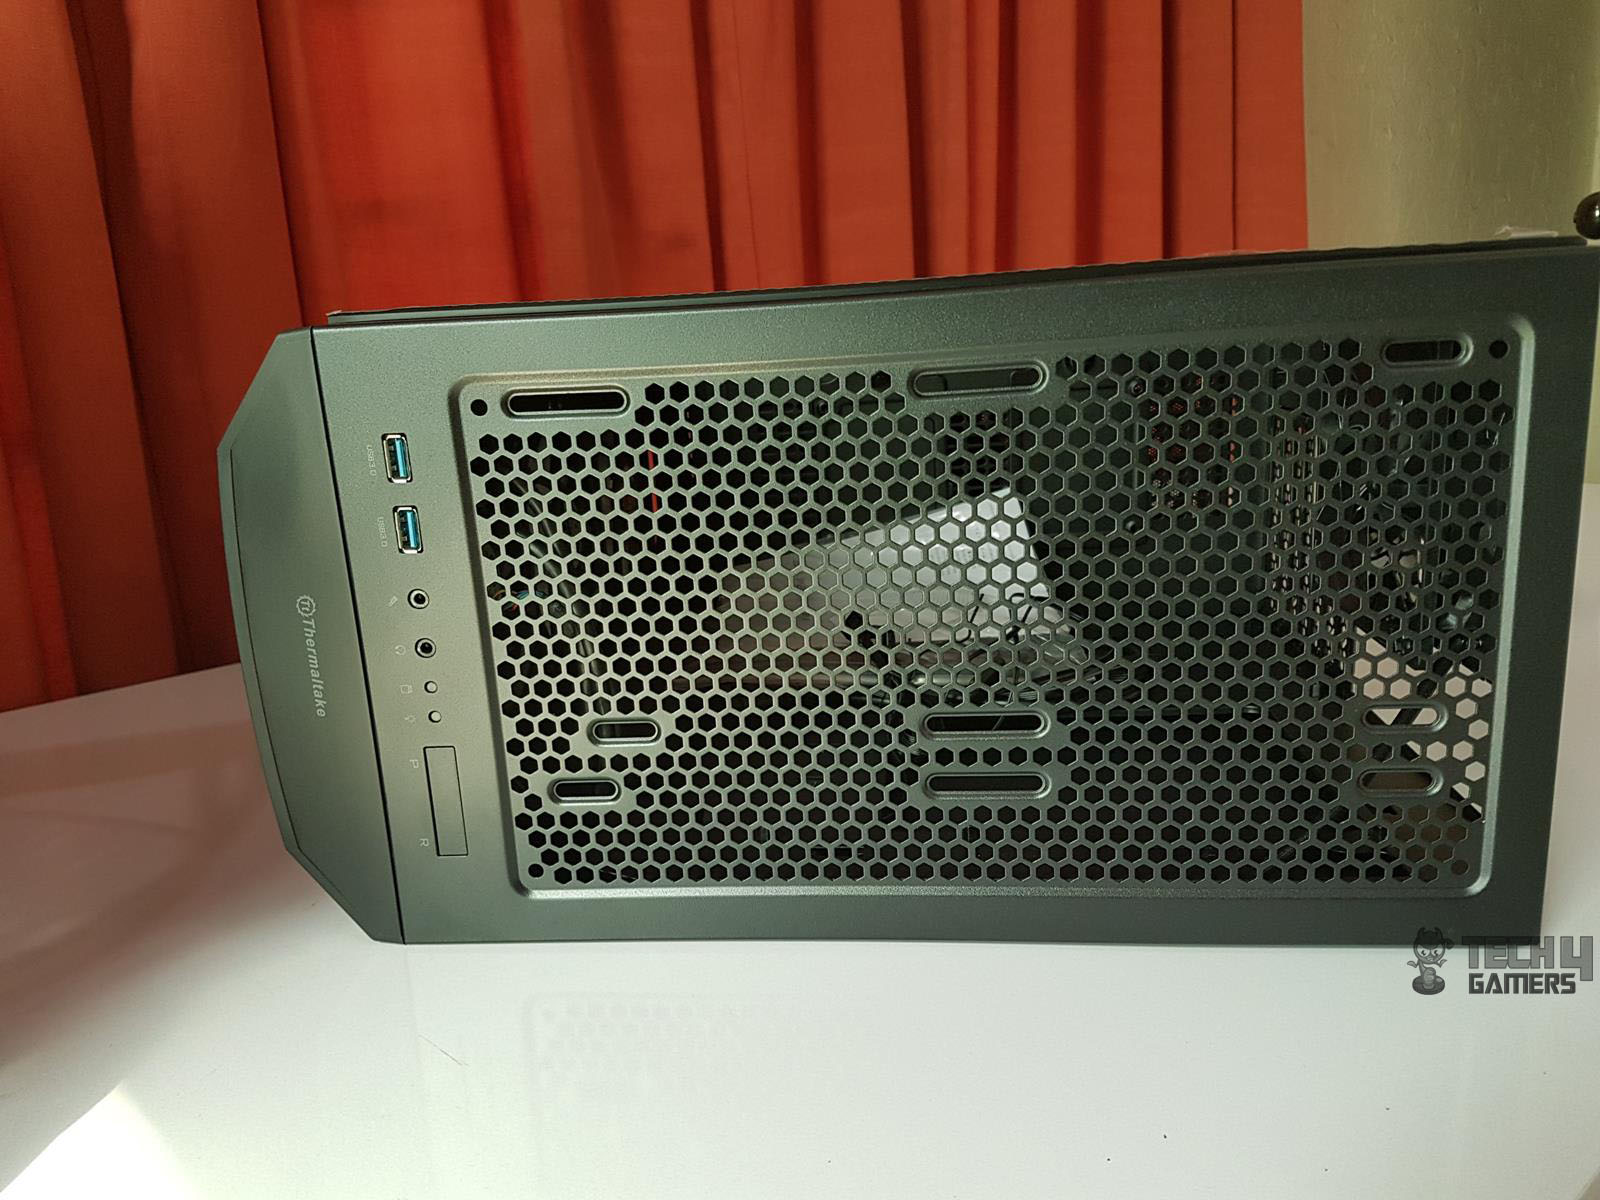
The front panel has a perforated mesh design which does look good in person. It is not fully covering the front side as there are angular solid covers on its left and right sides, making the overall look and feel to be gorgeous and bold. The overall design is coherent, and the front panel meshing is in the design of expanding while going downwards.
This gives it aggressive yet stunning looks in person. The front panel can be taken off by putting the hand under it and pulling it out. The overall build quality is good indeed, without any flex, particularly on the motherboard tray. Thermaltake means business with this chassis.
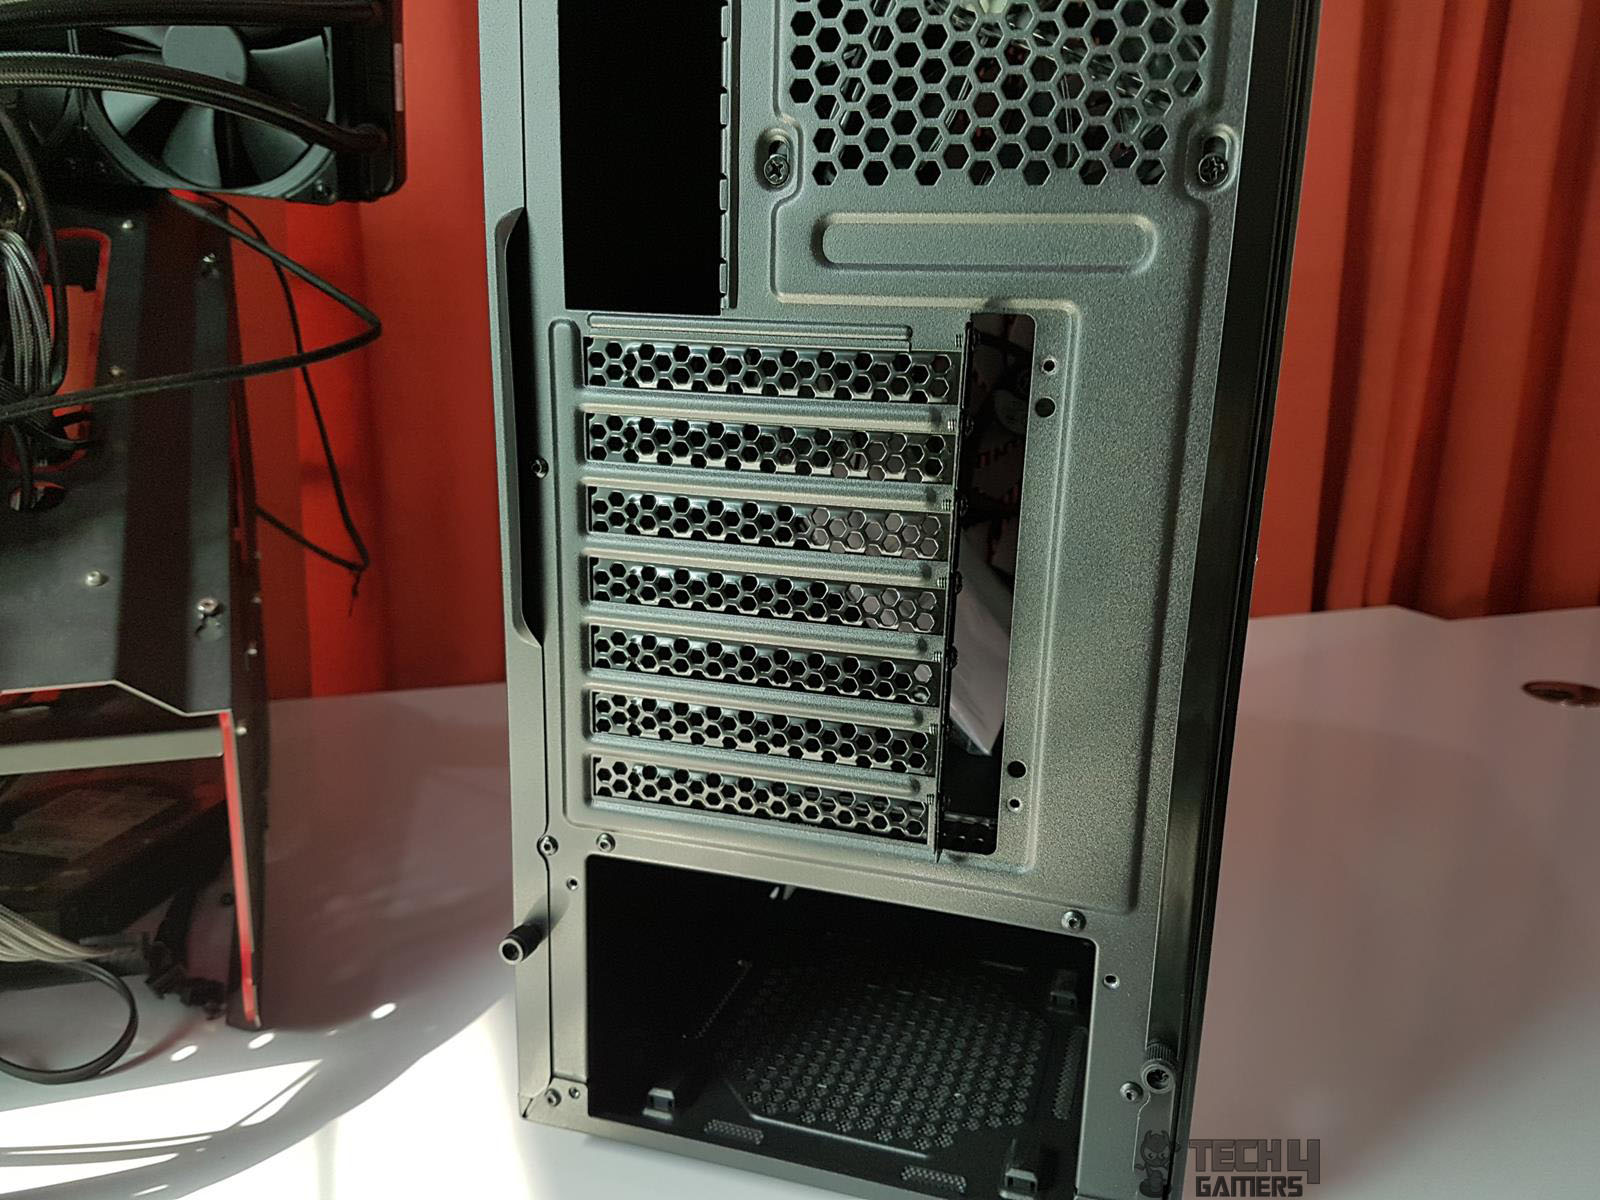
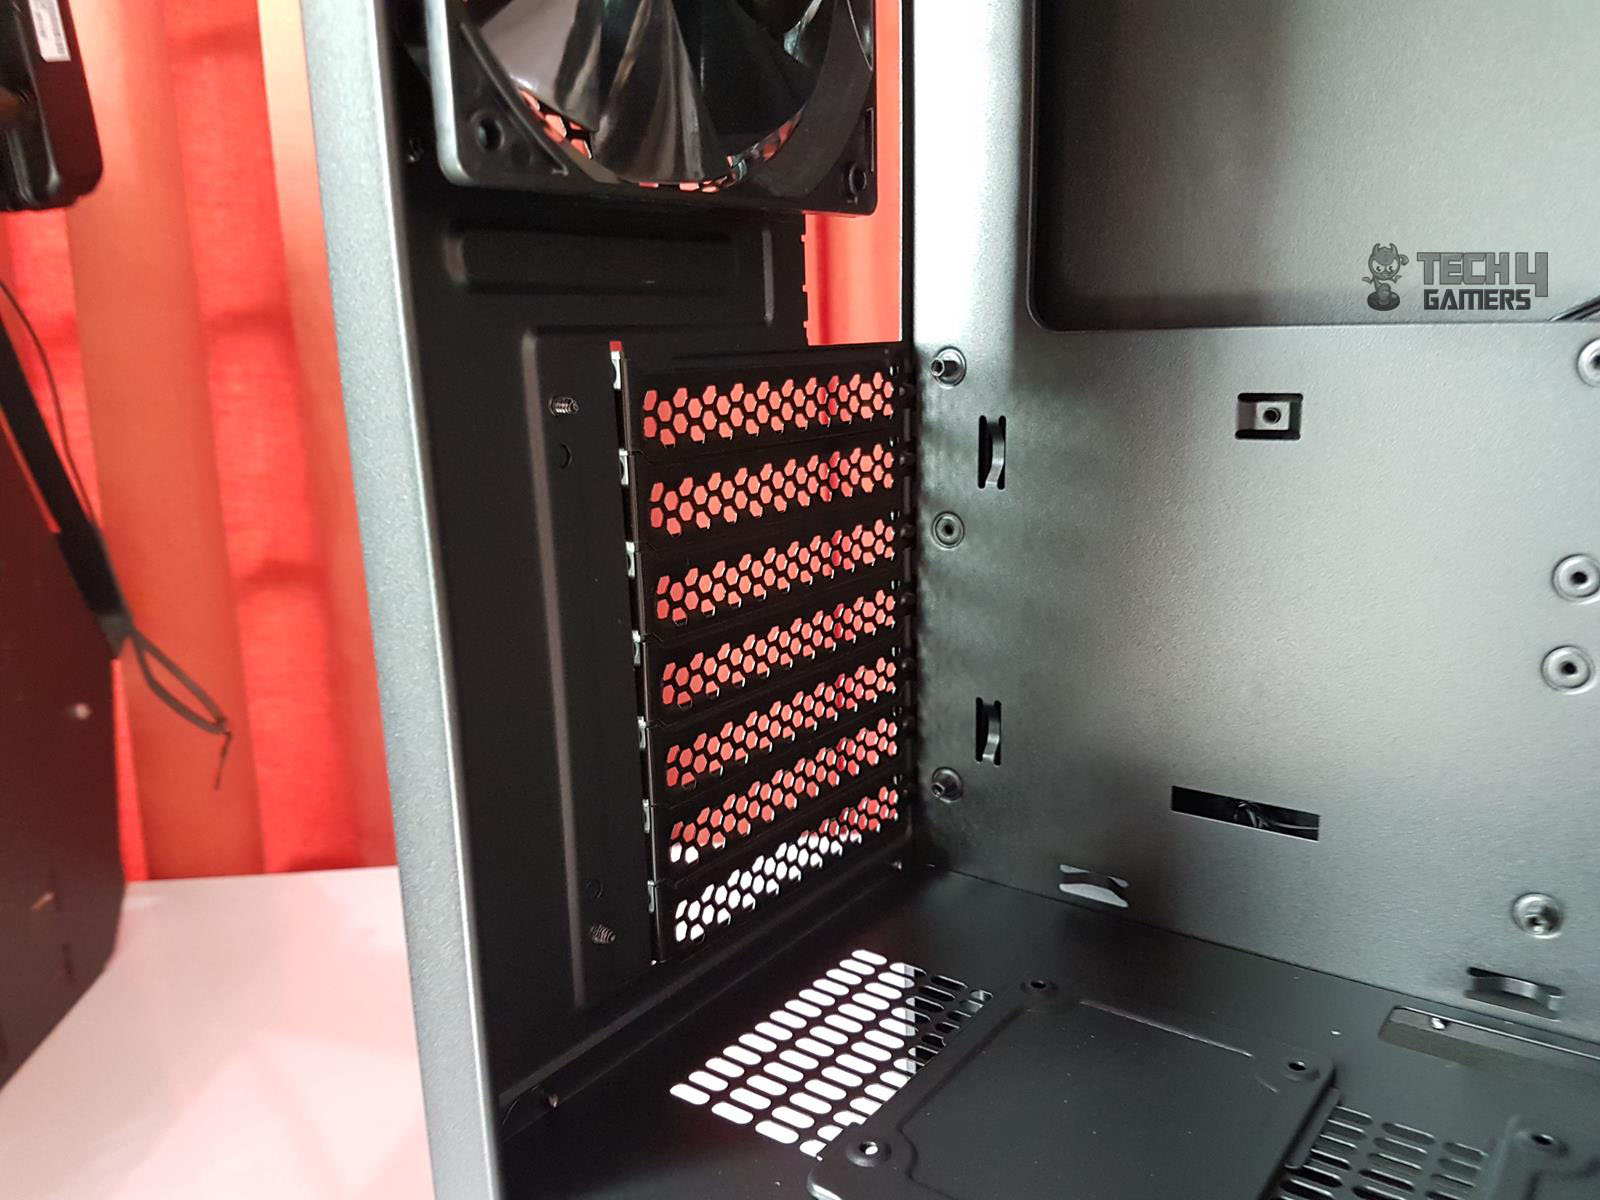
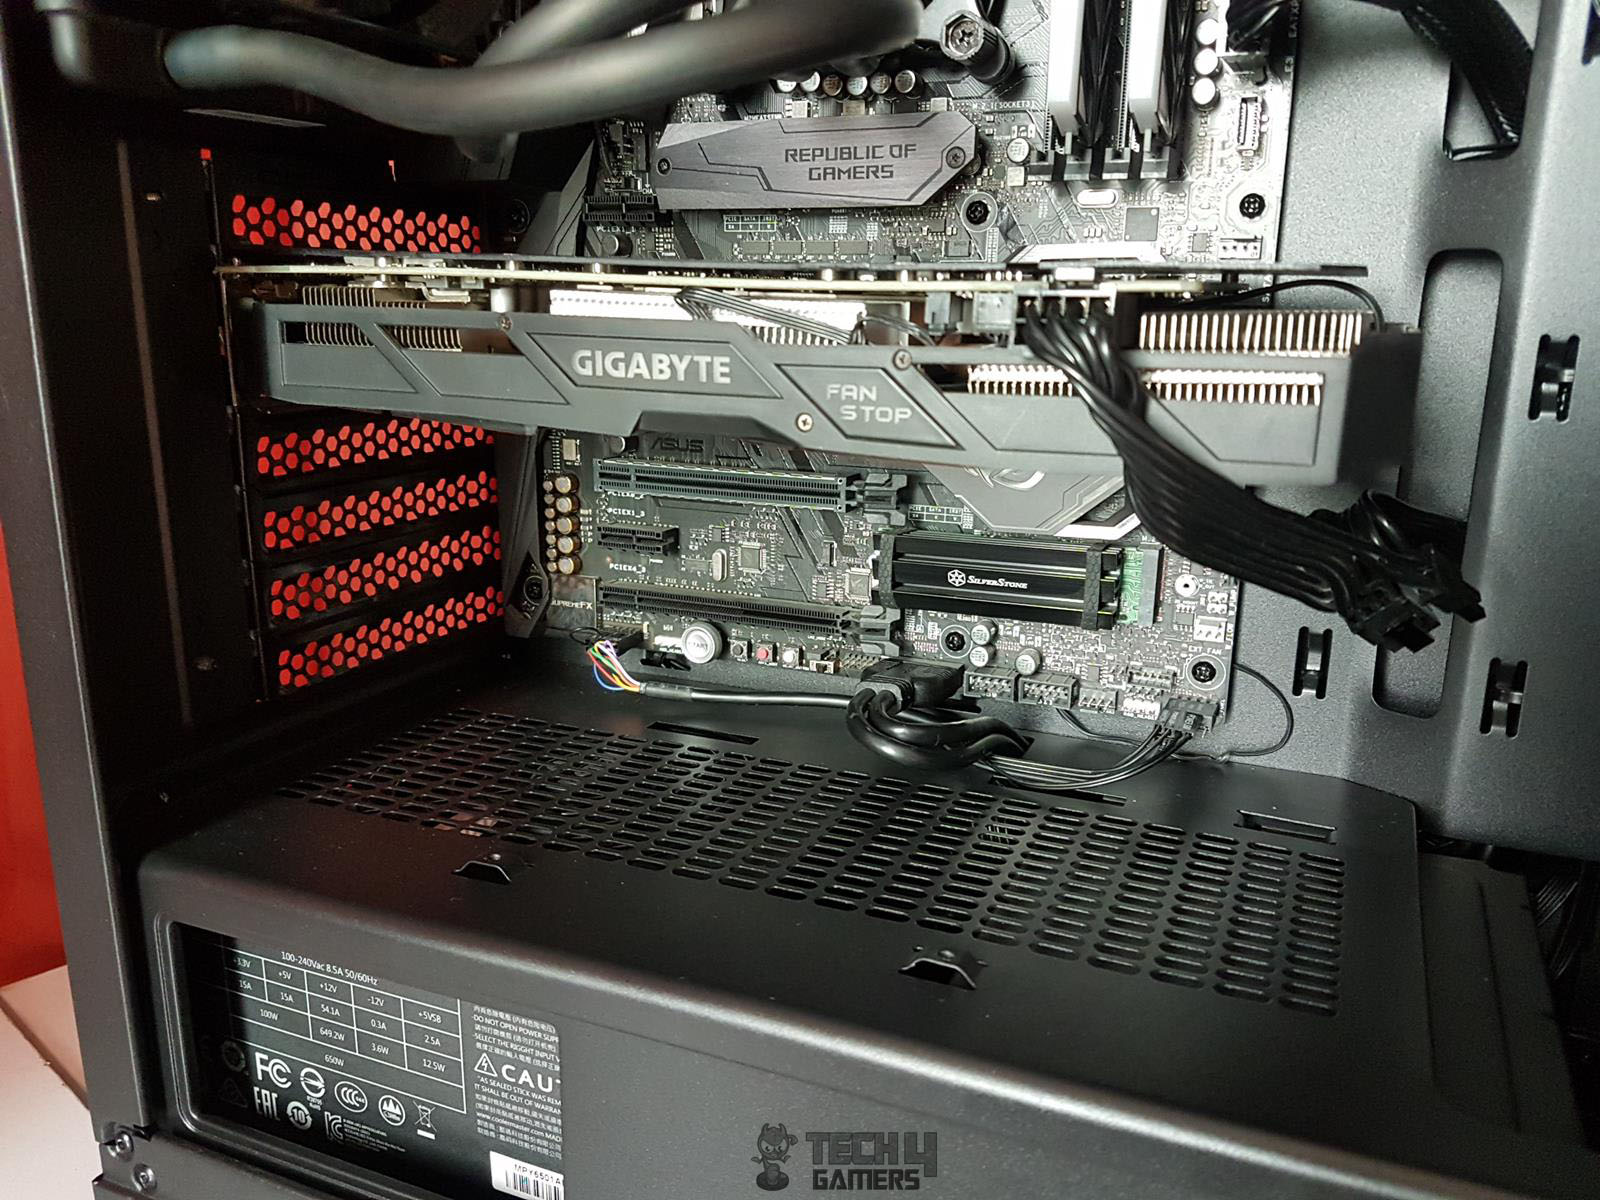
Let’s take a look at the rear of the chassis. There is a cutout for the motherboard’s I/O shield. On its right side, we have a mounting provision for a 120mm fan with up to 2 height-adjustable fan mounts. Below that, we have 7 PCIe slot covers with mesh design. Again, we are seeing a different design approach for the PCIe slot covers. They are in the plane of the chassis frame and are secured using a bracket that covers the slots and secured with the frame using two screws.
The user would need to remove two screws to remove this bracket cover and then access the slot covers. Unfortunately, this design was not helpful with the graphics card as the narrow gap between the slot covers and the chassis frame was obstructing the graphics card’s I/O panel. So, take care while installing or removing the graphics card in this chassis.
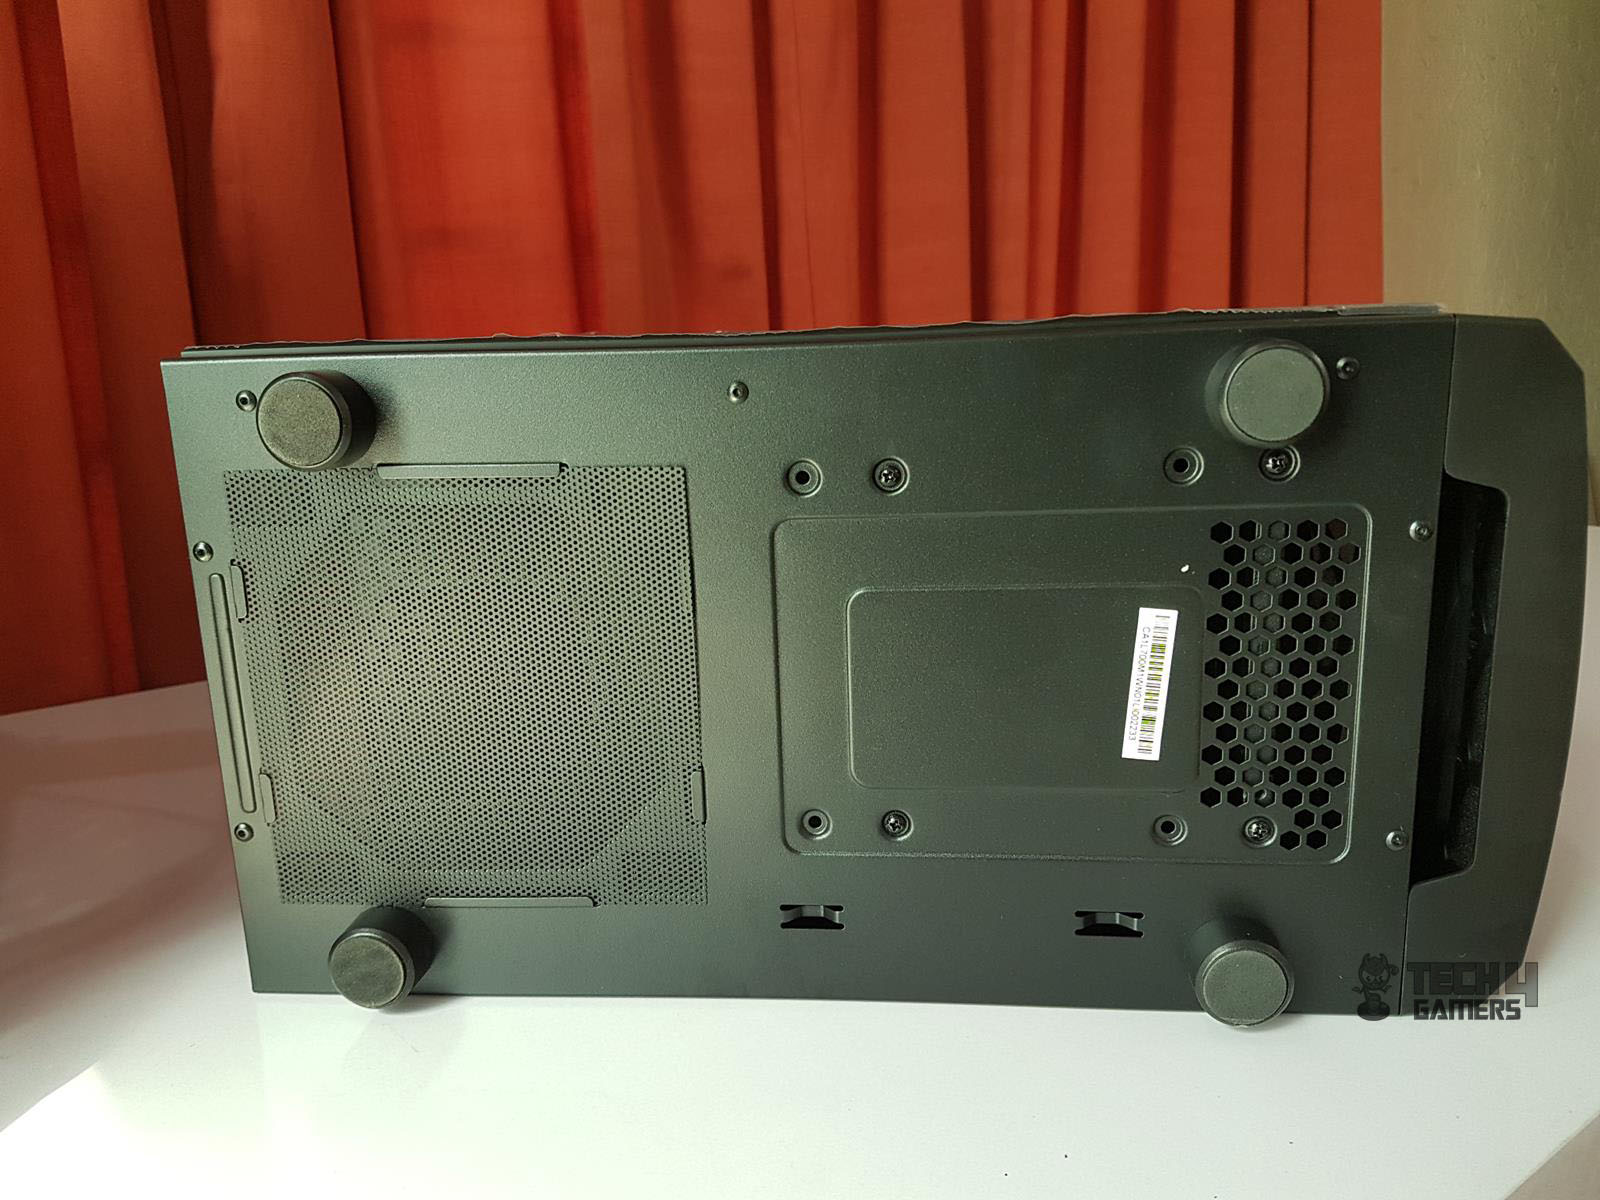
At the bottom, there is a standard ATX size PSU mounting area with a difference. Thermaltake has provided a bracket or holder for the PSU. The bracket is mounted to the PSU and then slides inside the chassis from the rear side. The bracket is then secured to the chassis frame using 4 screws.

The underside area of the chassis has a non-magnetic dust filter beneath the PSU area. This dust filter is quite difficult to put back on once it is removed. On its right side, we can see 4 screws with a total of 8 mounting holes. The HDD cage can be mounted on any of these two sets of 4 mounting holes. There is a gap of 15mm between these two sets. There is a perforated area on the right side of the HDD cage mounting area.
There is a gap between the front panel and the chassis frame of approximately 17.5x124mm. This cutout is on the front panel only and serves two purposes; additional air intake side and a groove using which the front panel is removed. There are 4 feet with rubber mounts on them. They raise the height of the chassis from the surface by 17mm.
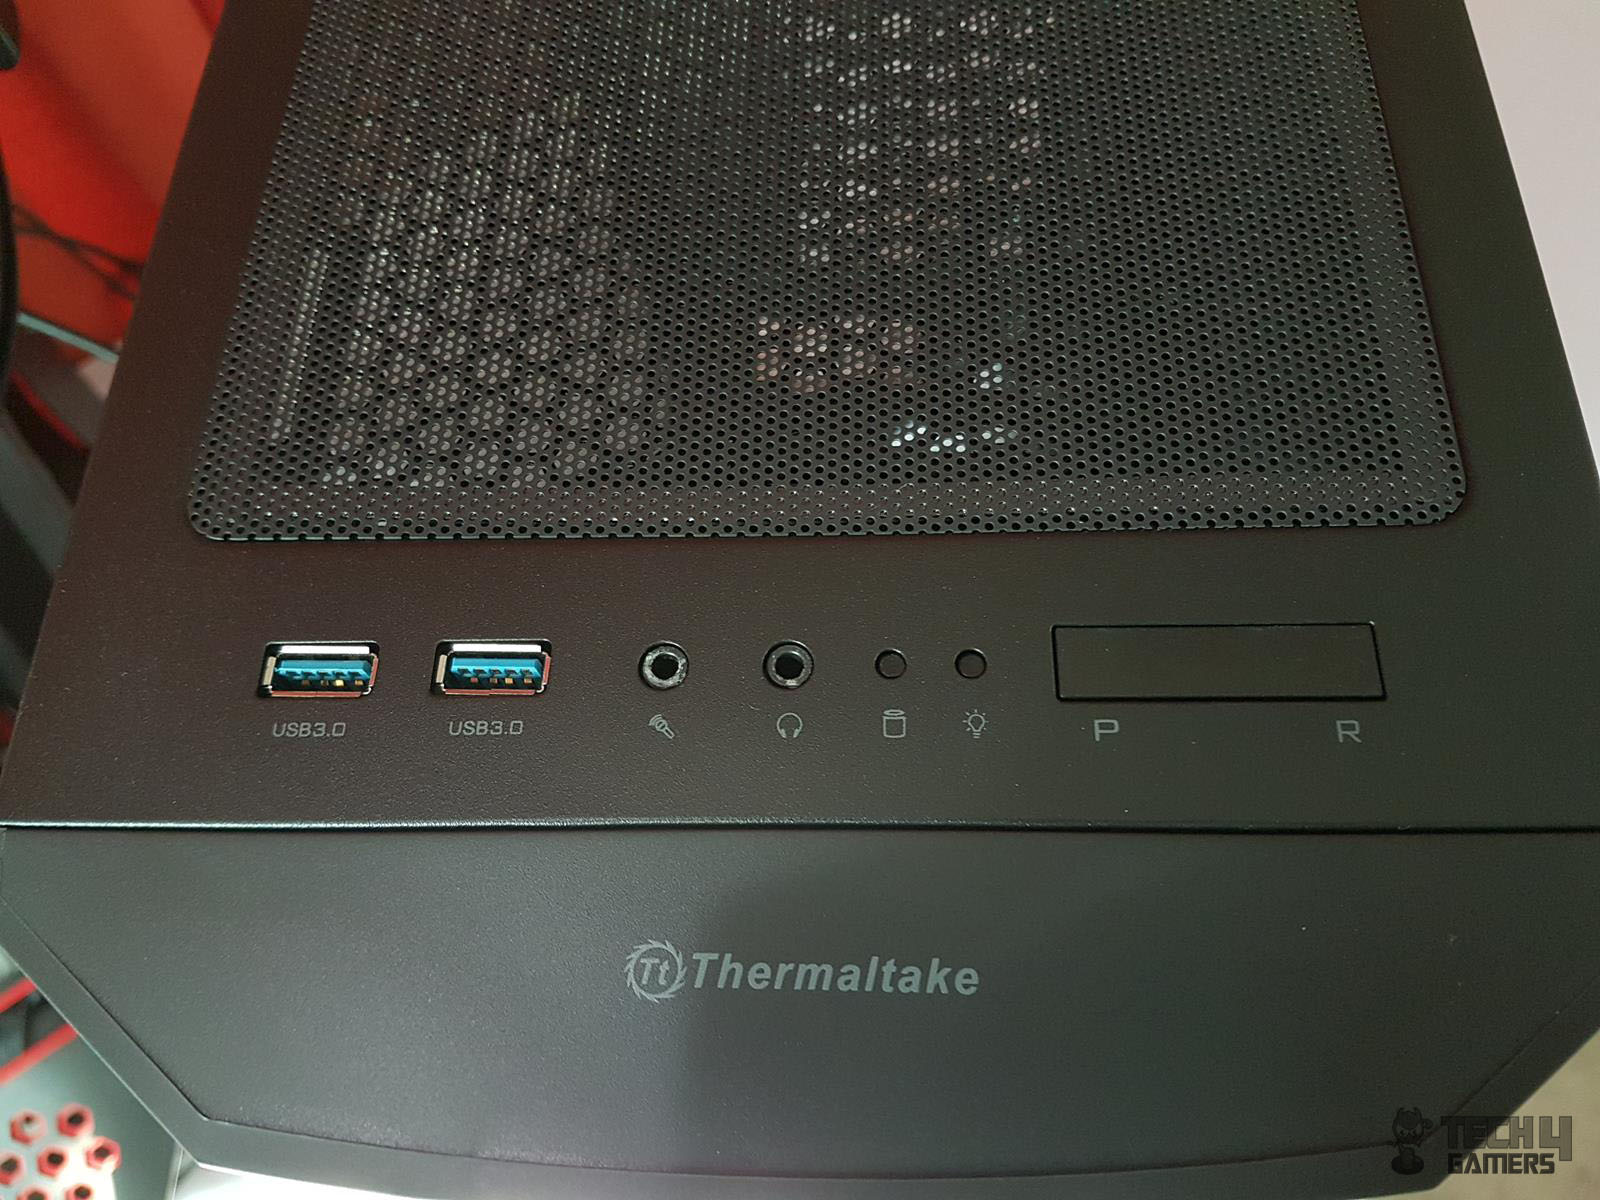
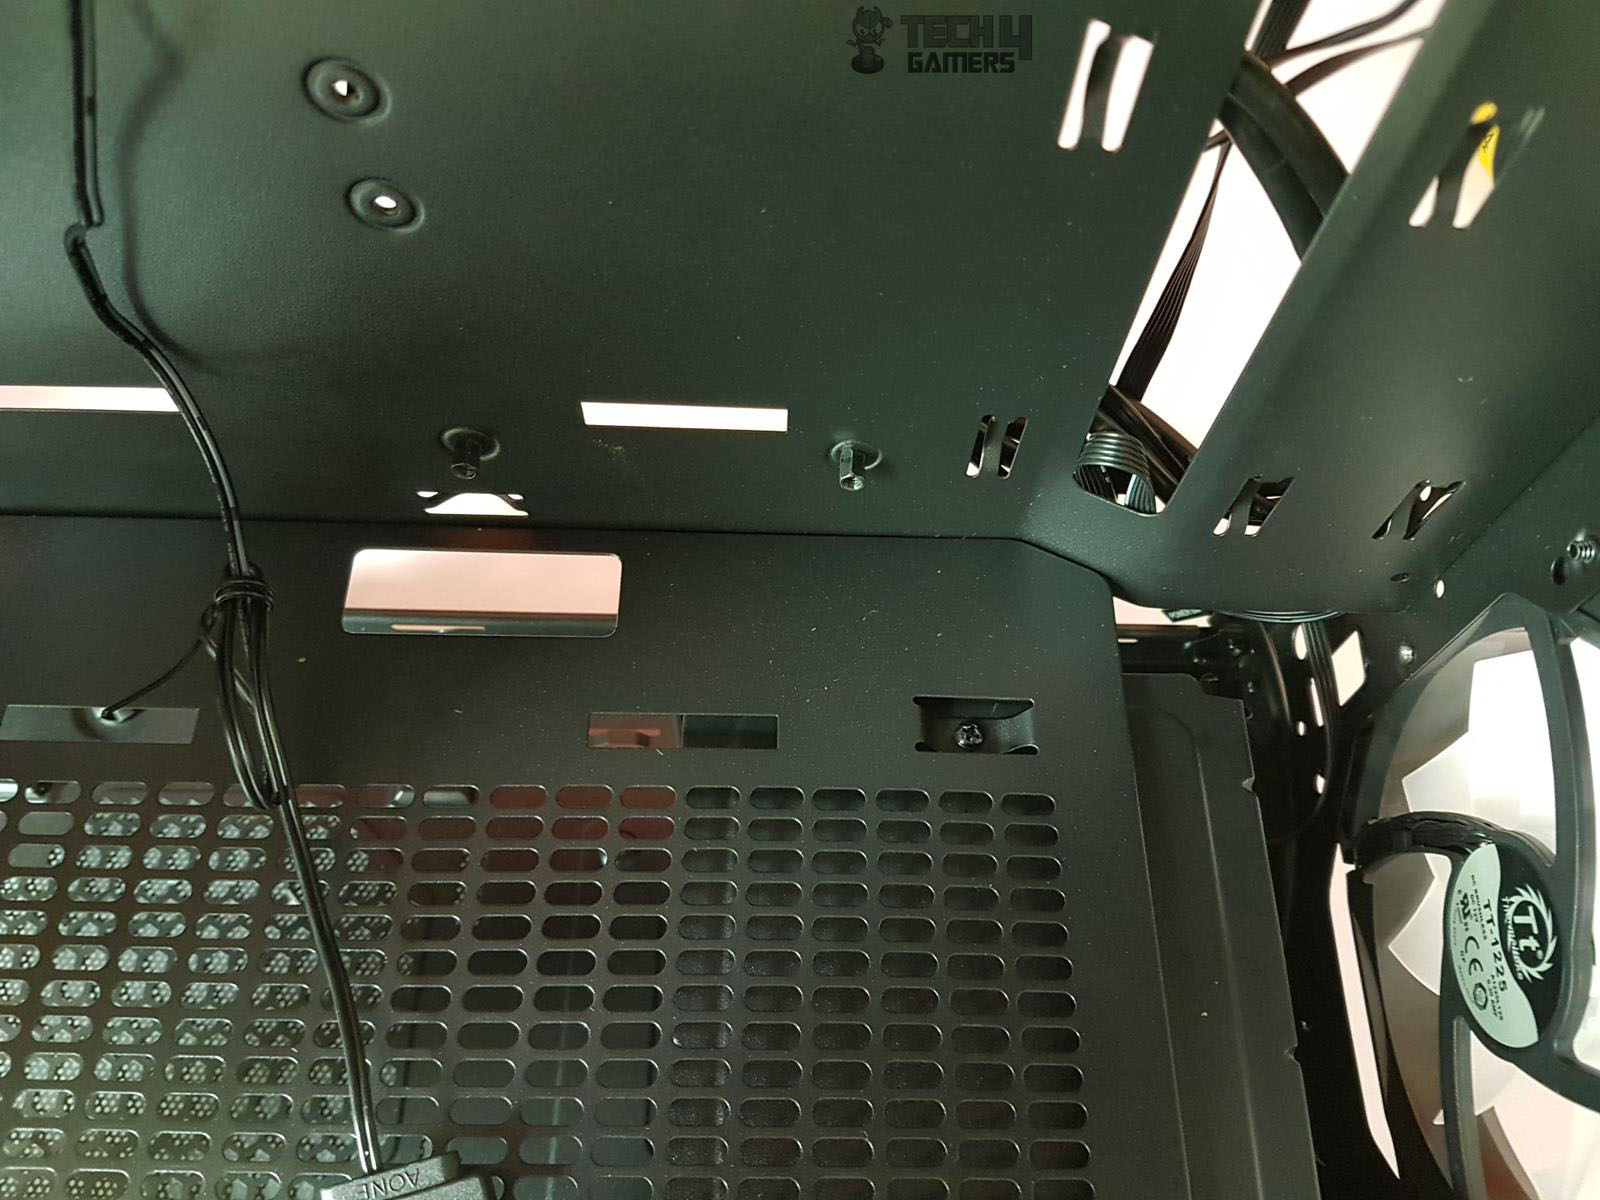
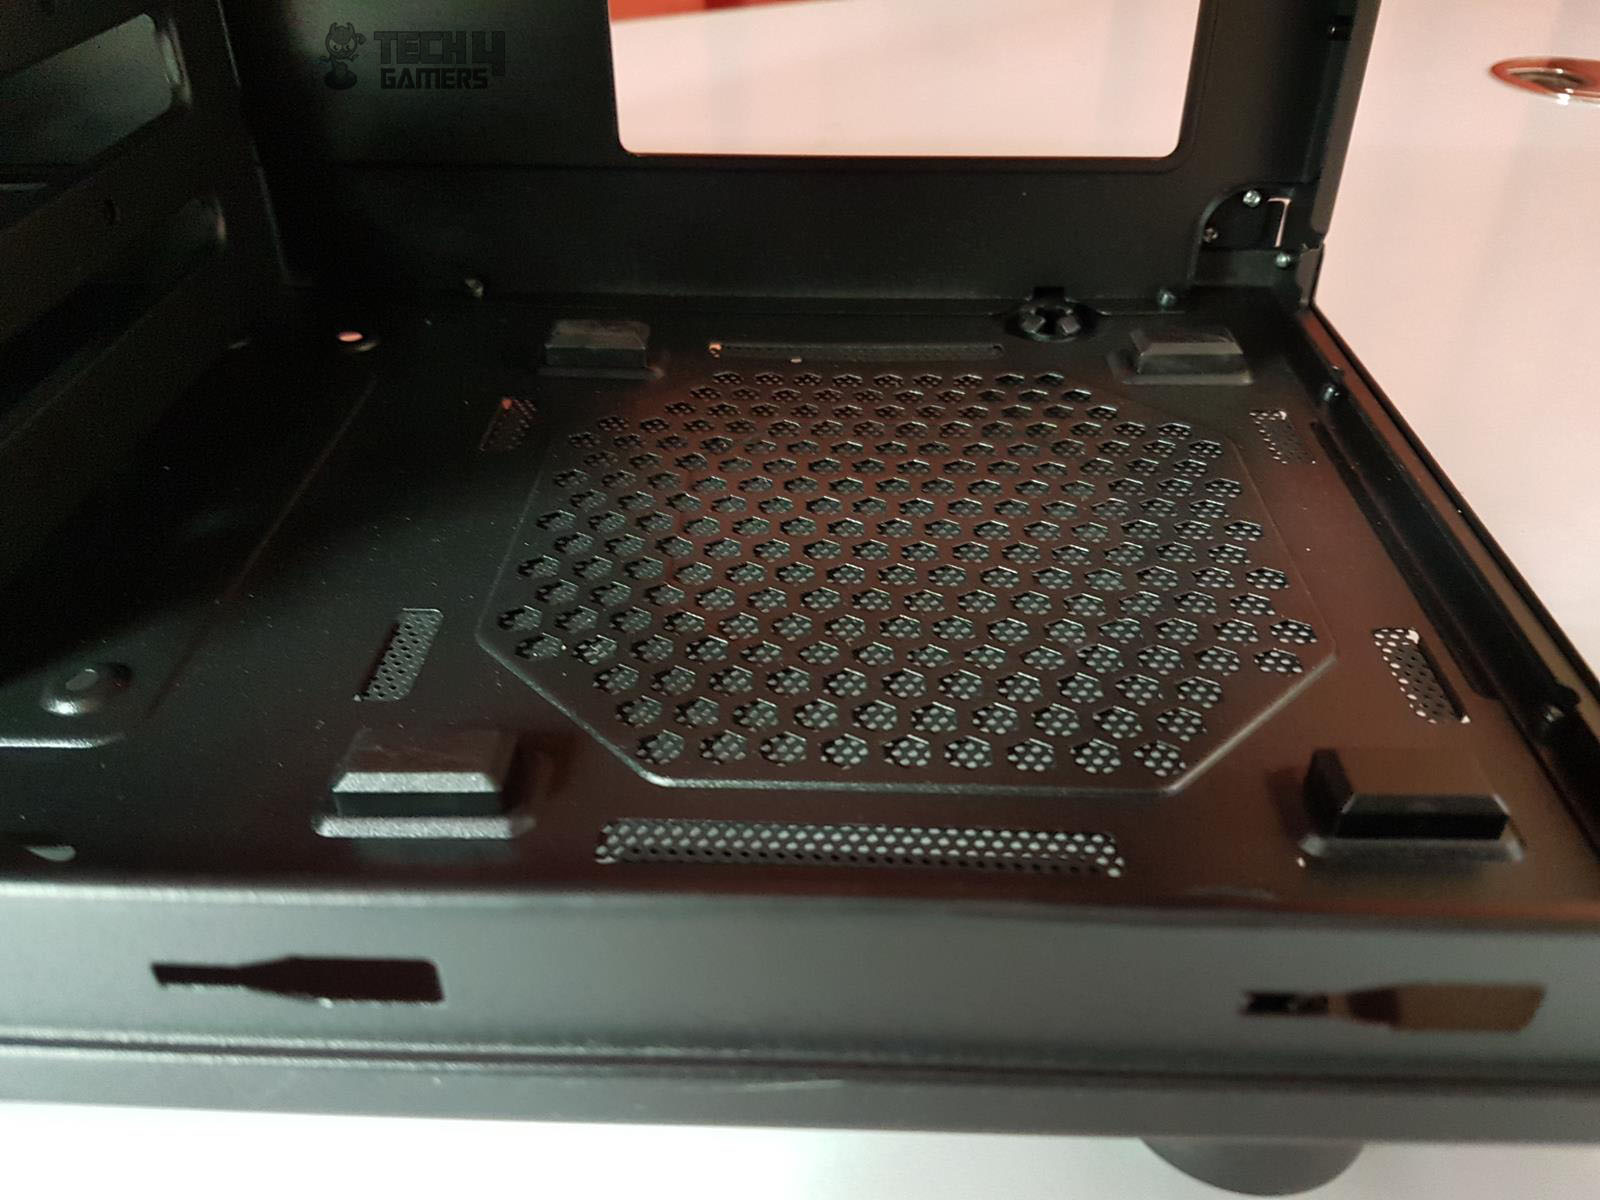
Finally, let’s take a look at the top side of the chassis. There is a large magnetic dust filter covering the perforated area for the 120/140mm fans. There is a distance of 30mm from the motherboard tray to the fan mounts. Thankfully, the position of the fans can be adjusted. The I/O panel is located on the top panel. Starting from the right side, we have two USB 3.0 ports, audio jacks, LED indicators, and a large-size Power and Reset button.
A single button for two operations! Be careful not to press the button from the center, or you will accidentally power off the PC. Press this button from its extreme ends only for the desired operation. The reset button is set to act as an RGB lighting controller by default. There is a dedicated controller PCB on the backside of the chassis. The reset switch is plugged into that PCB. There are a Thermaltake brand logo and name printed in white color on the top of the front panel.
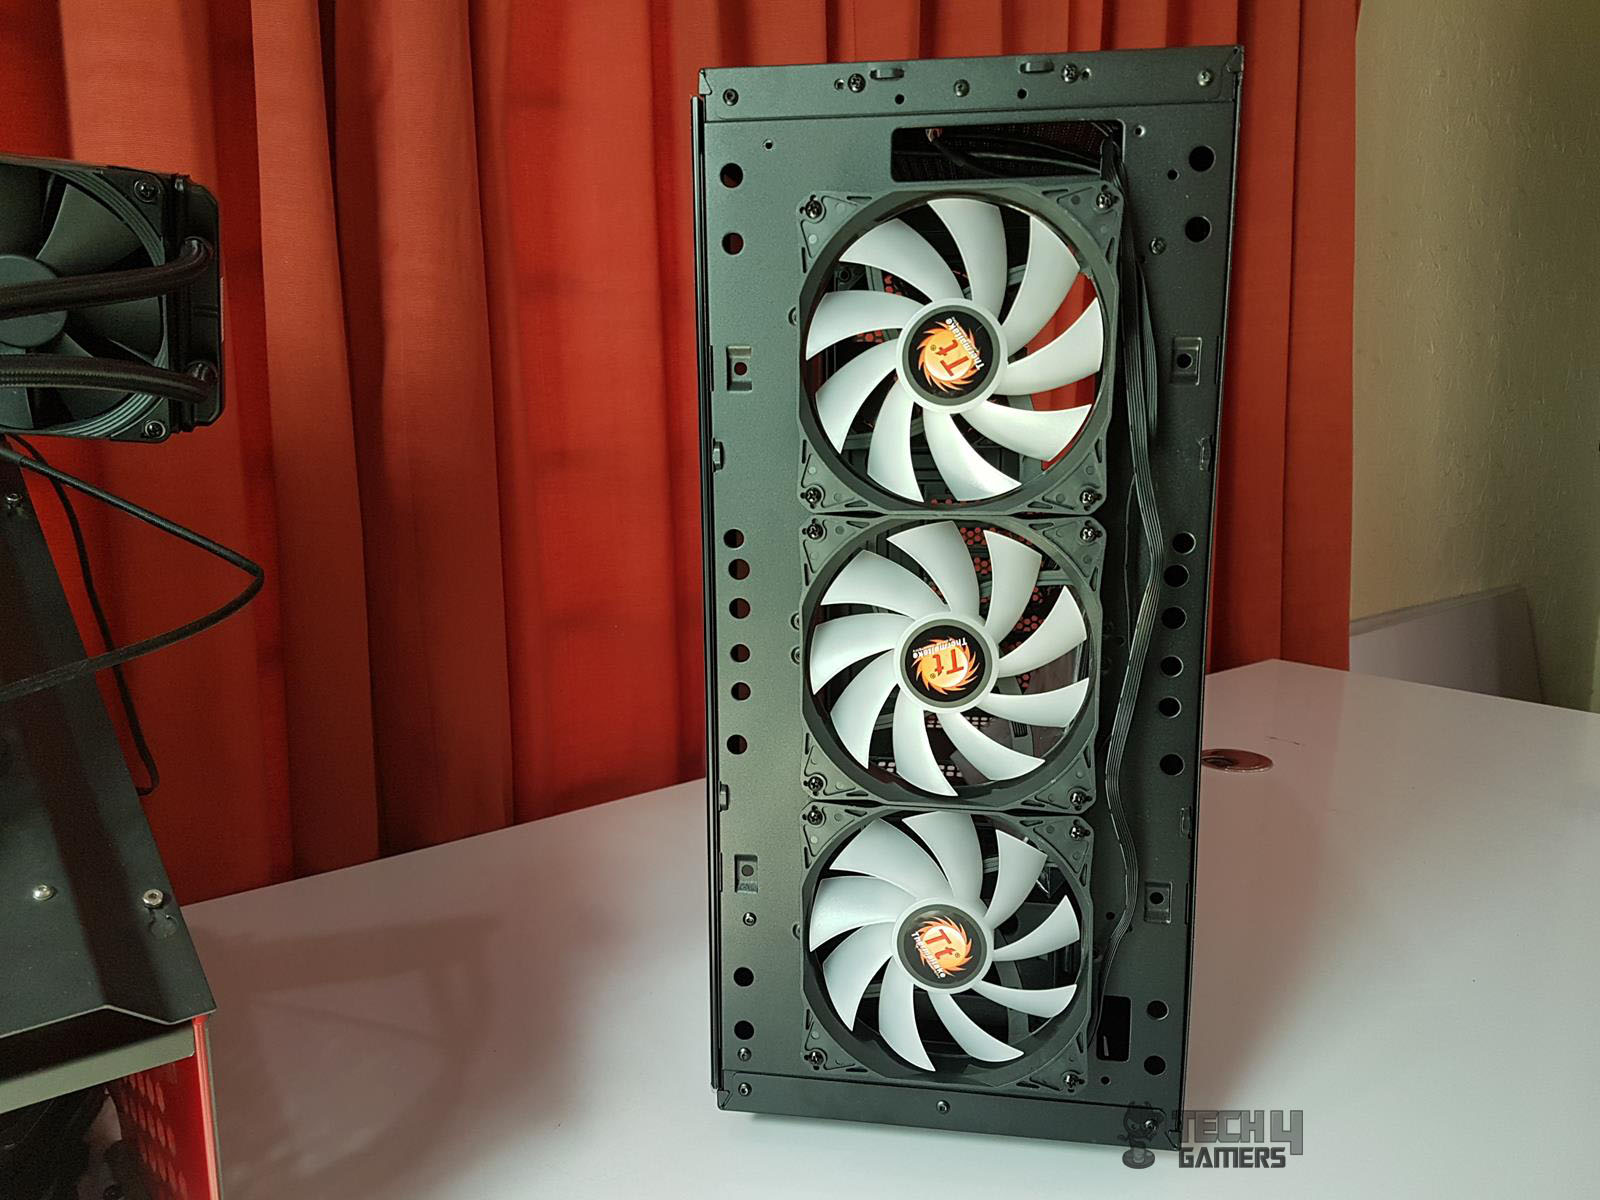
It is time to dig inside the chassis and see what it offers to the users. Starting from the front panel, after we pop it off, we can see three fans pre-installed on the front. They are the RGB fans using the +12V GRB pin format. There is a large size cutout on the top from where the fan cables can be routed. Also, there is a small cutout at the bottom right for the same purpose. The middle fan’s cable has to go through either cutout.
Thermaltake is stating that up to two 140mm fans can also be installed on the front. It is obvious that mounting two 140 mm fans would limit their airflow as the cutout on the front side is scaled for the 120mm fans only. The rest of the surface is solid. A perforation on the sides would have improved the situation for the 140mm mounting. Each fan has white color 9 impellers and is rated at 1000 RPM at 16dBA. They are indeed silent, though, at 1000 RPM, they don’t push that much airflow; their quantity makes up for it.
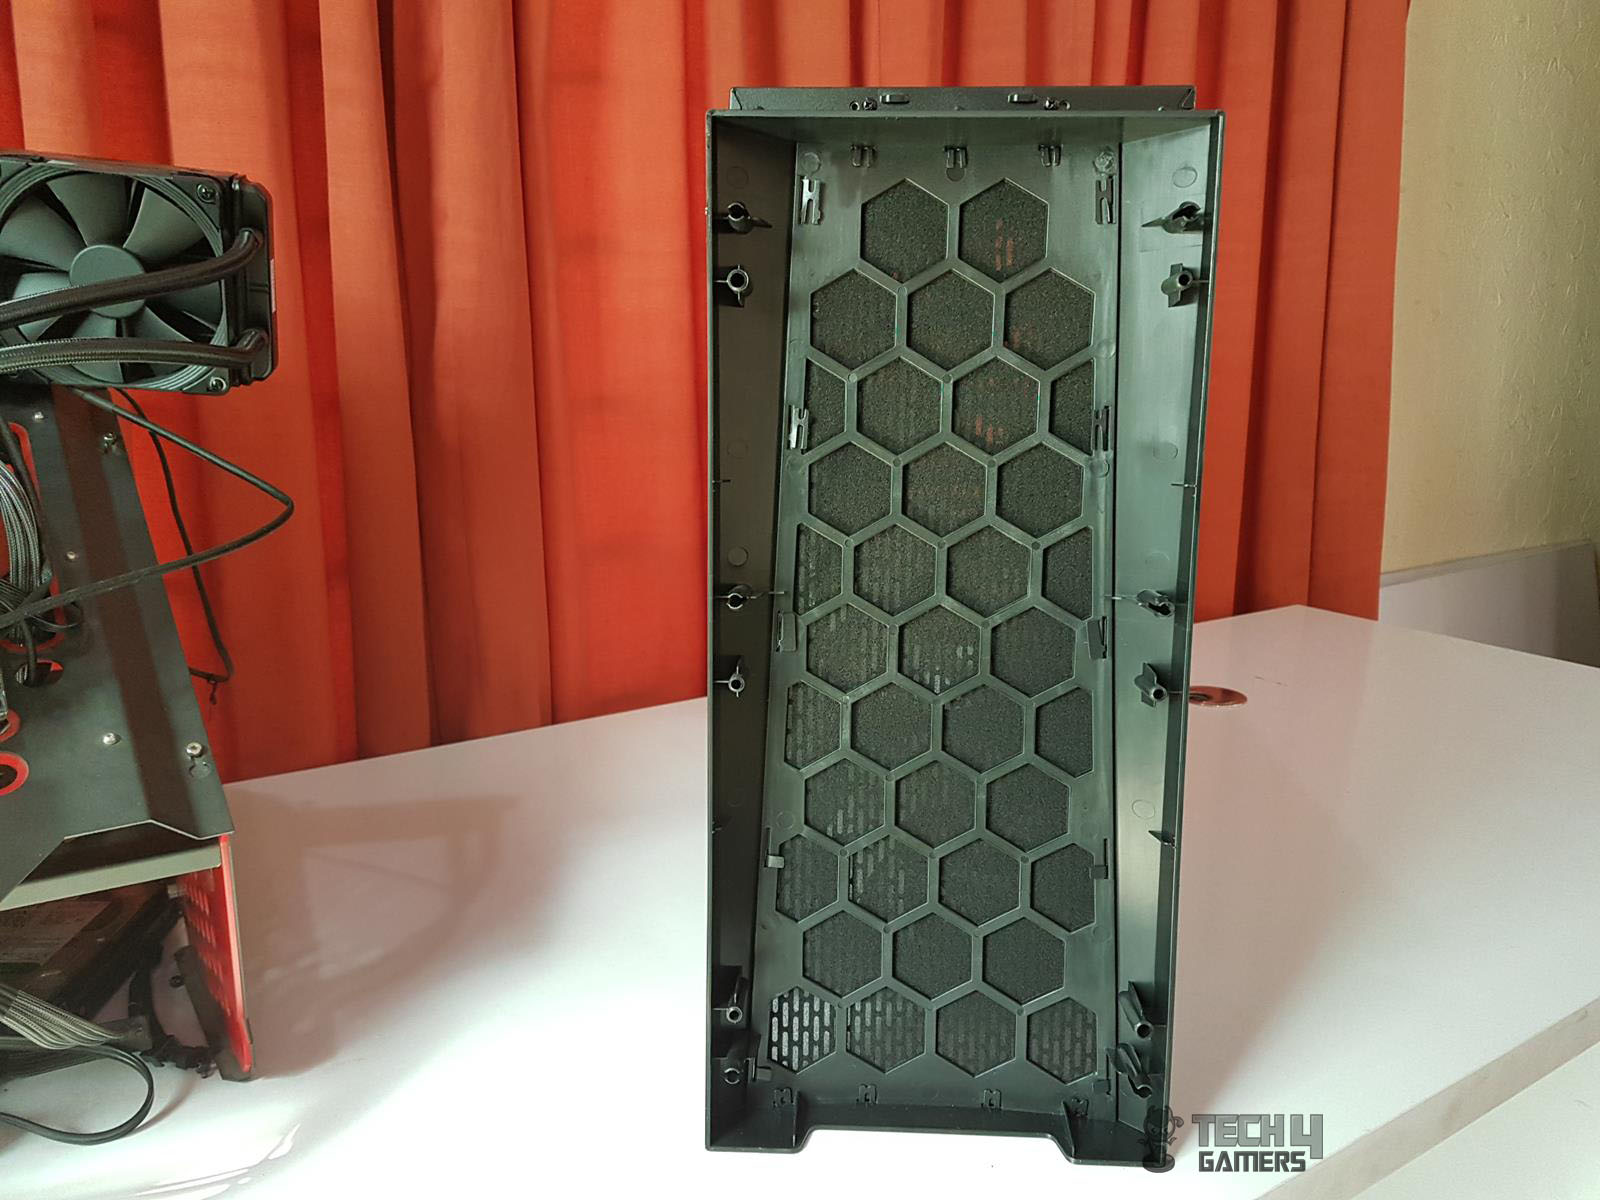
The inside of the front panel has a honeycomb structure. There is a thin layer of foam inside this structure. Maybe this is their way of filtering the air! It does not seem to be removable.
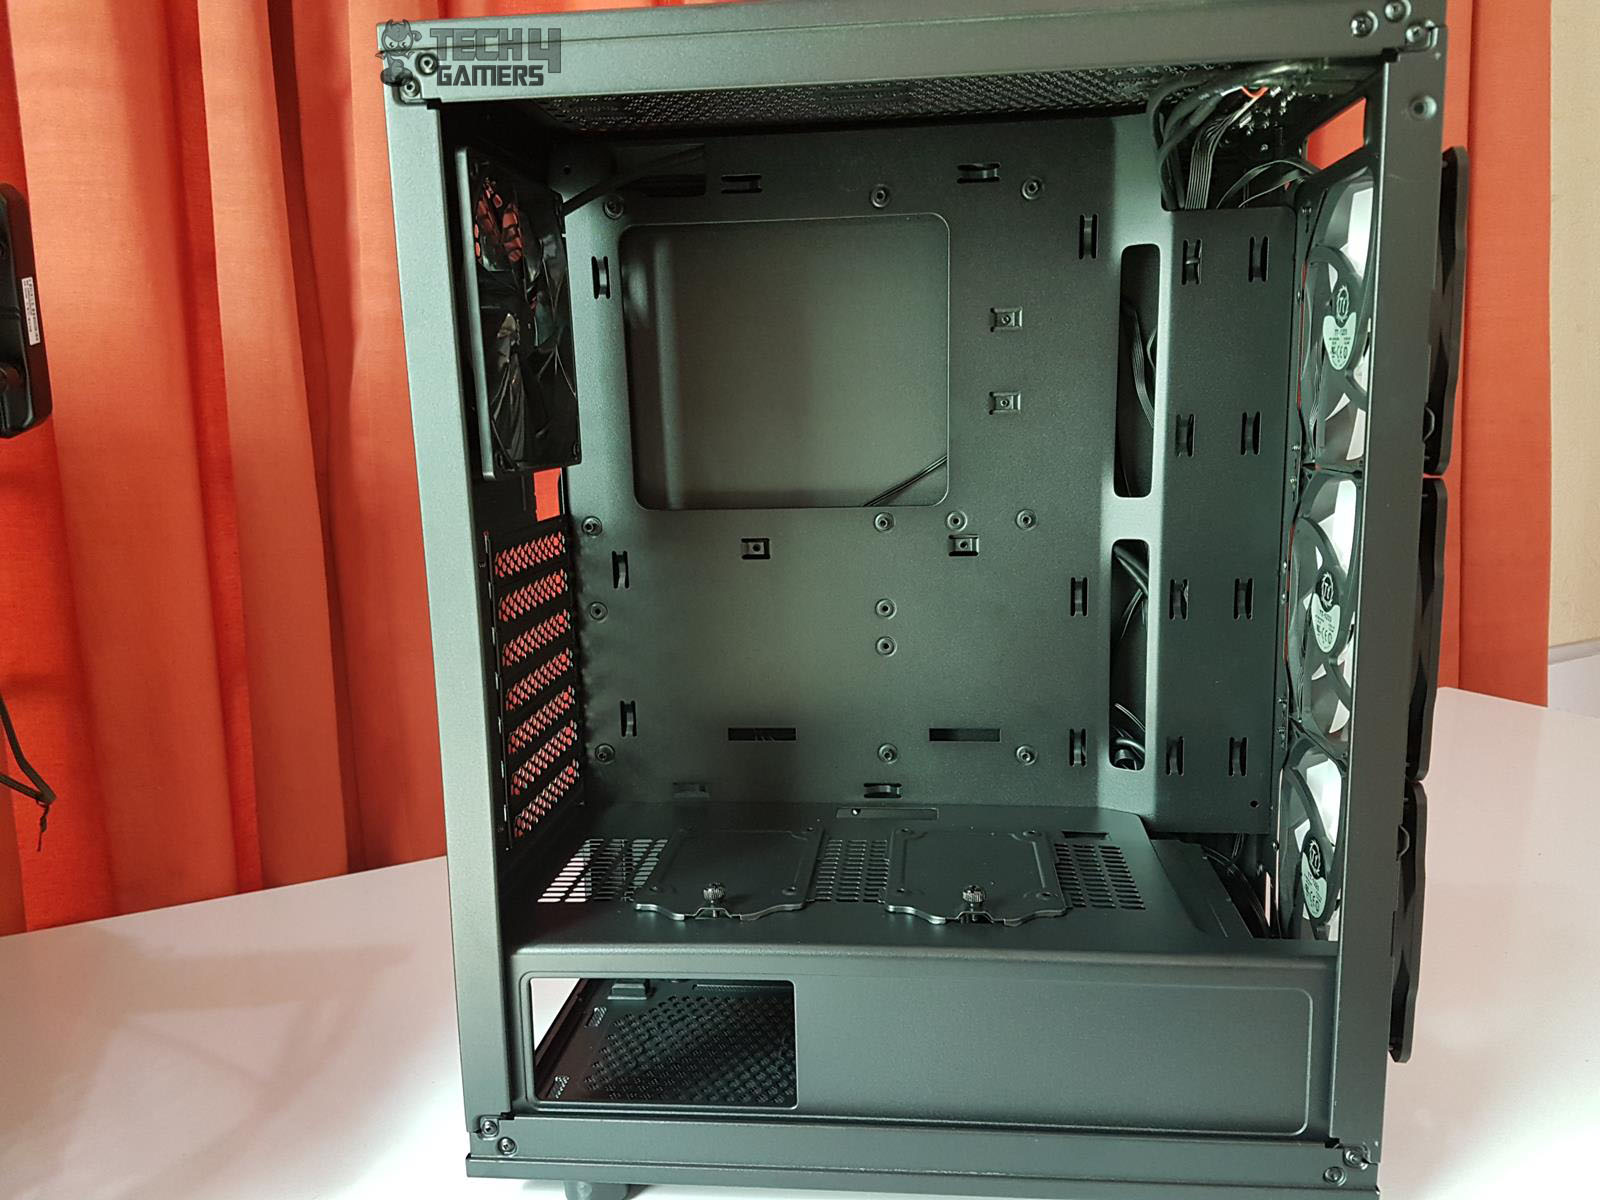
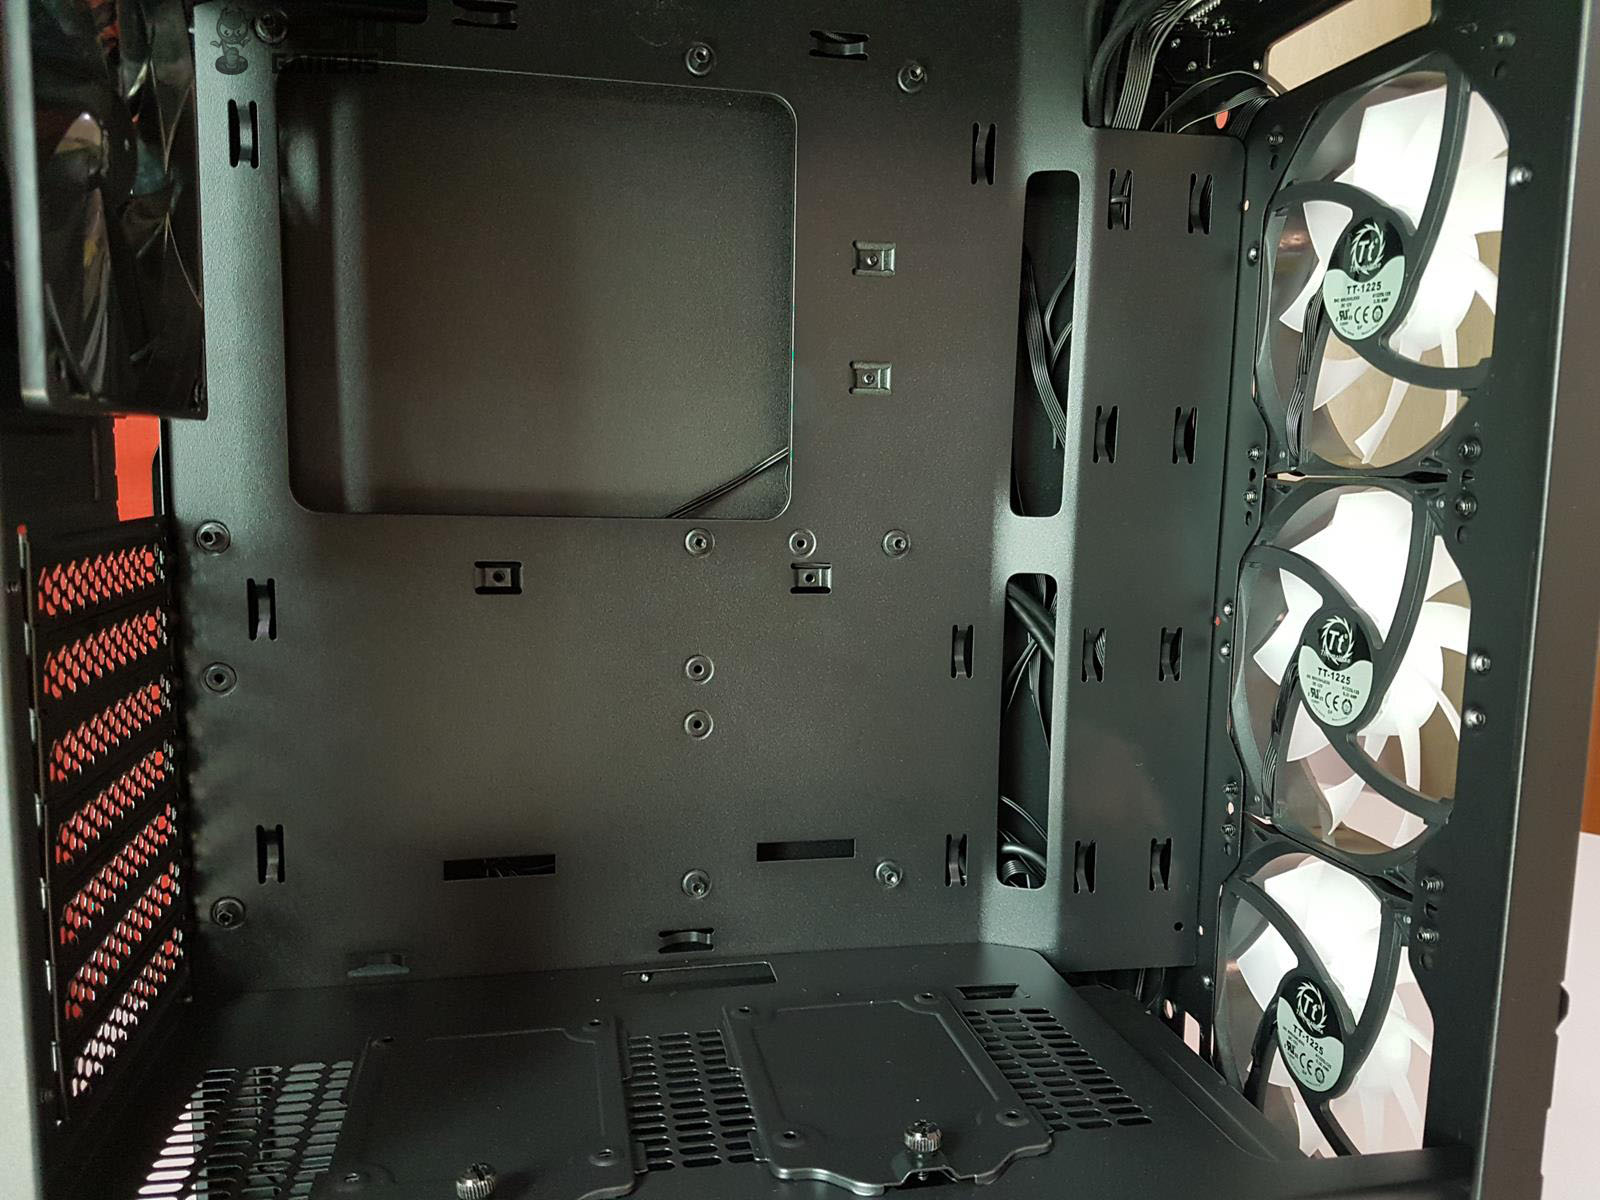
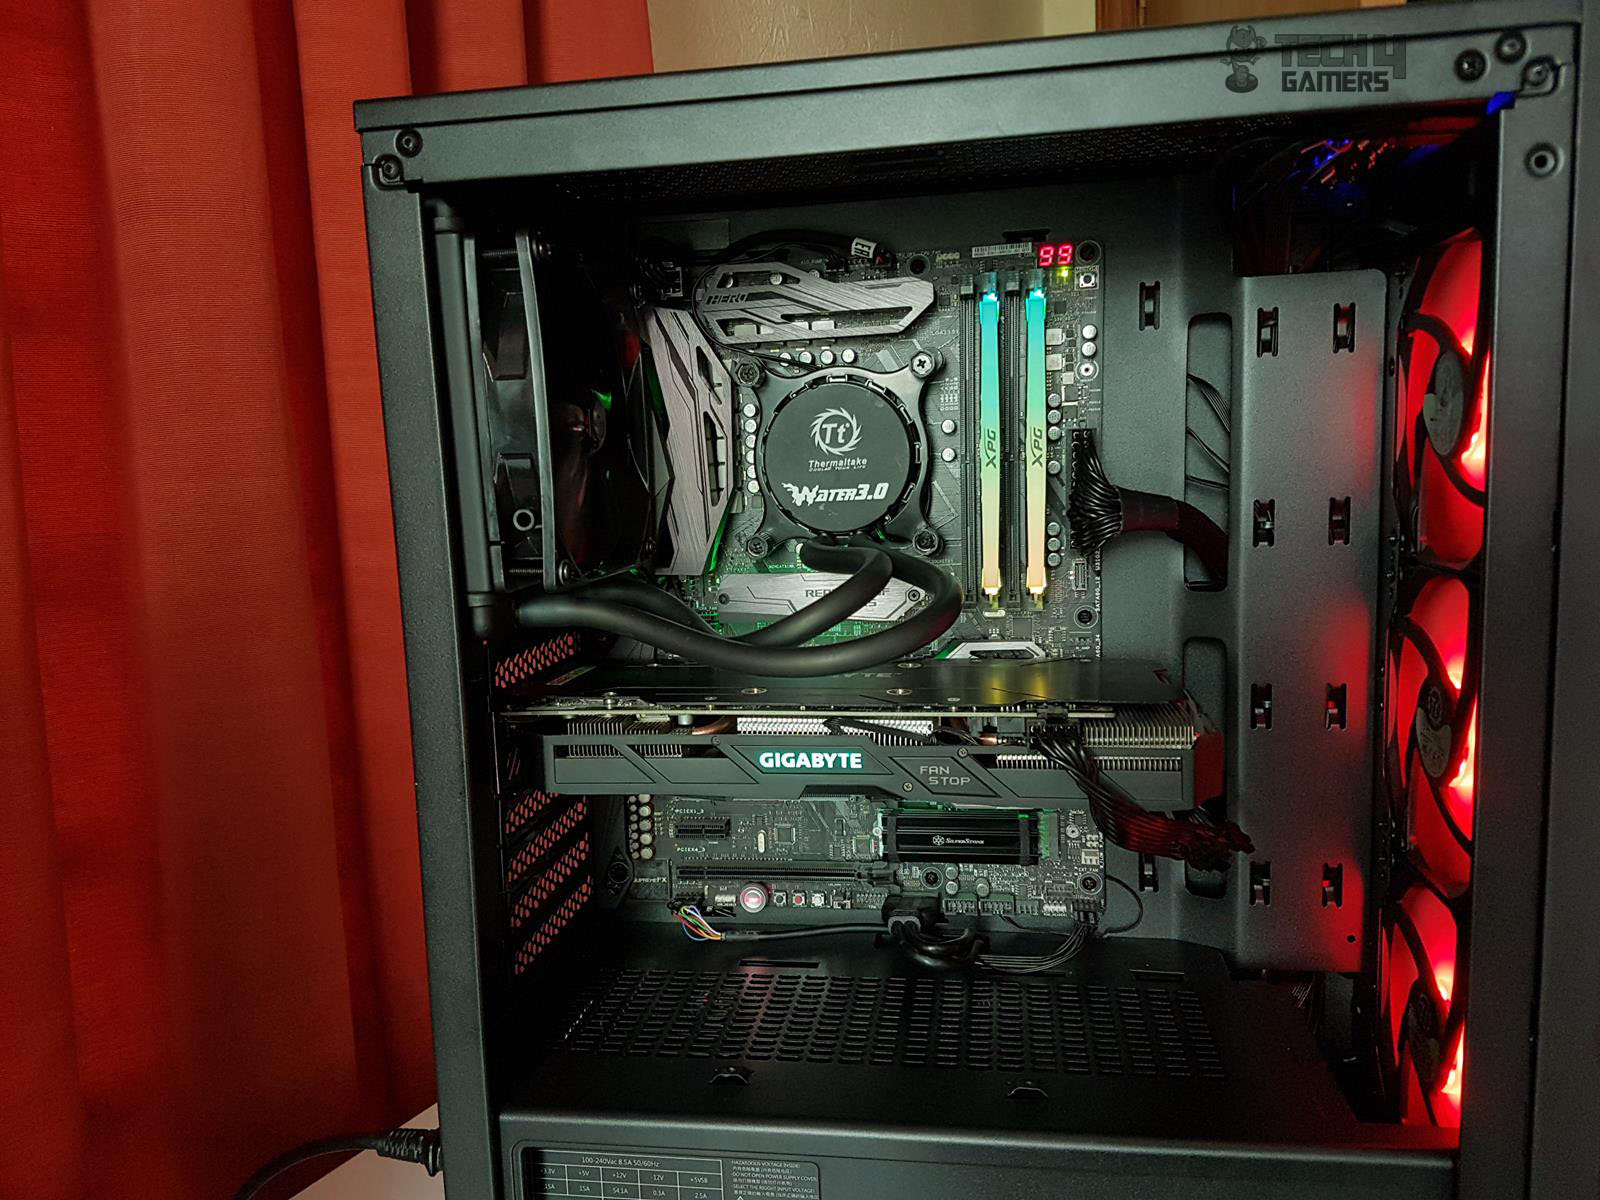
It is time to take a look inside the chassis. The internal layout is spacious and well thought-out. The standoffs are pre-installed. Surprisingly, there is no marking for the MicroATX, mini-ITX, and full ATX sizing, which is quite a norm these days. For an experienced user, this won’t be an issue, but for the first timers, this could have been. The motherboard tray is solid and does not have any flex. The motherboard tray is a bit recessed as compared to the right-side paneling, which is a wise move by Thermaltake.
There are two large size vertical cutouts right on the slope, which makes the cable passing easier and also helps with the cable management on the backside, which I will cover shortly as well. There is a large-size CPU cutout in the tray for ease of installing the CPU cooler with the motherboard already installed in the chassis. There is a displacement of 28mm from the top side of the chassis to the top of the motherboard. Say bye-bye to any radiator possibility up top, and they have already covered it in the specifications that no radiator is supported on the top.
There is a single cutout on the top left side above the motherboard tray. This is to route the 8-pin EPS cables and rear fan cables. Make sure to pass your EPS cable before installing the motherboard; otherwise, it would be quite challenging for two reasons; the top side of the motherboard restricts some part of this cutout, and second, it is also covered by the frame of the chassis on the backside.
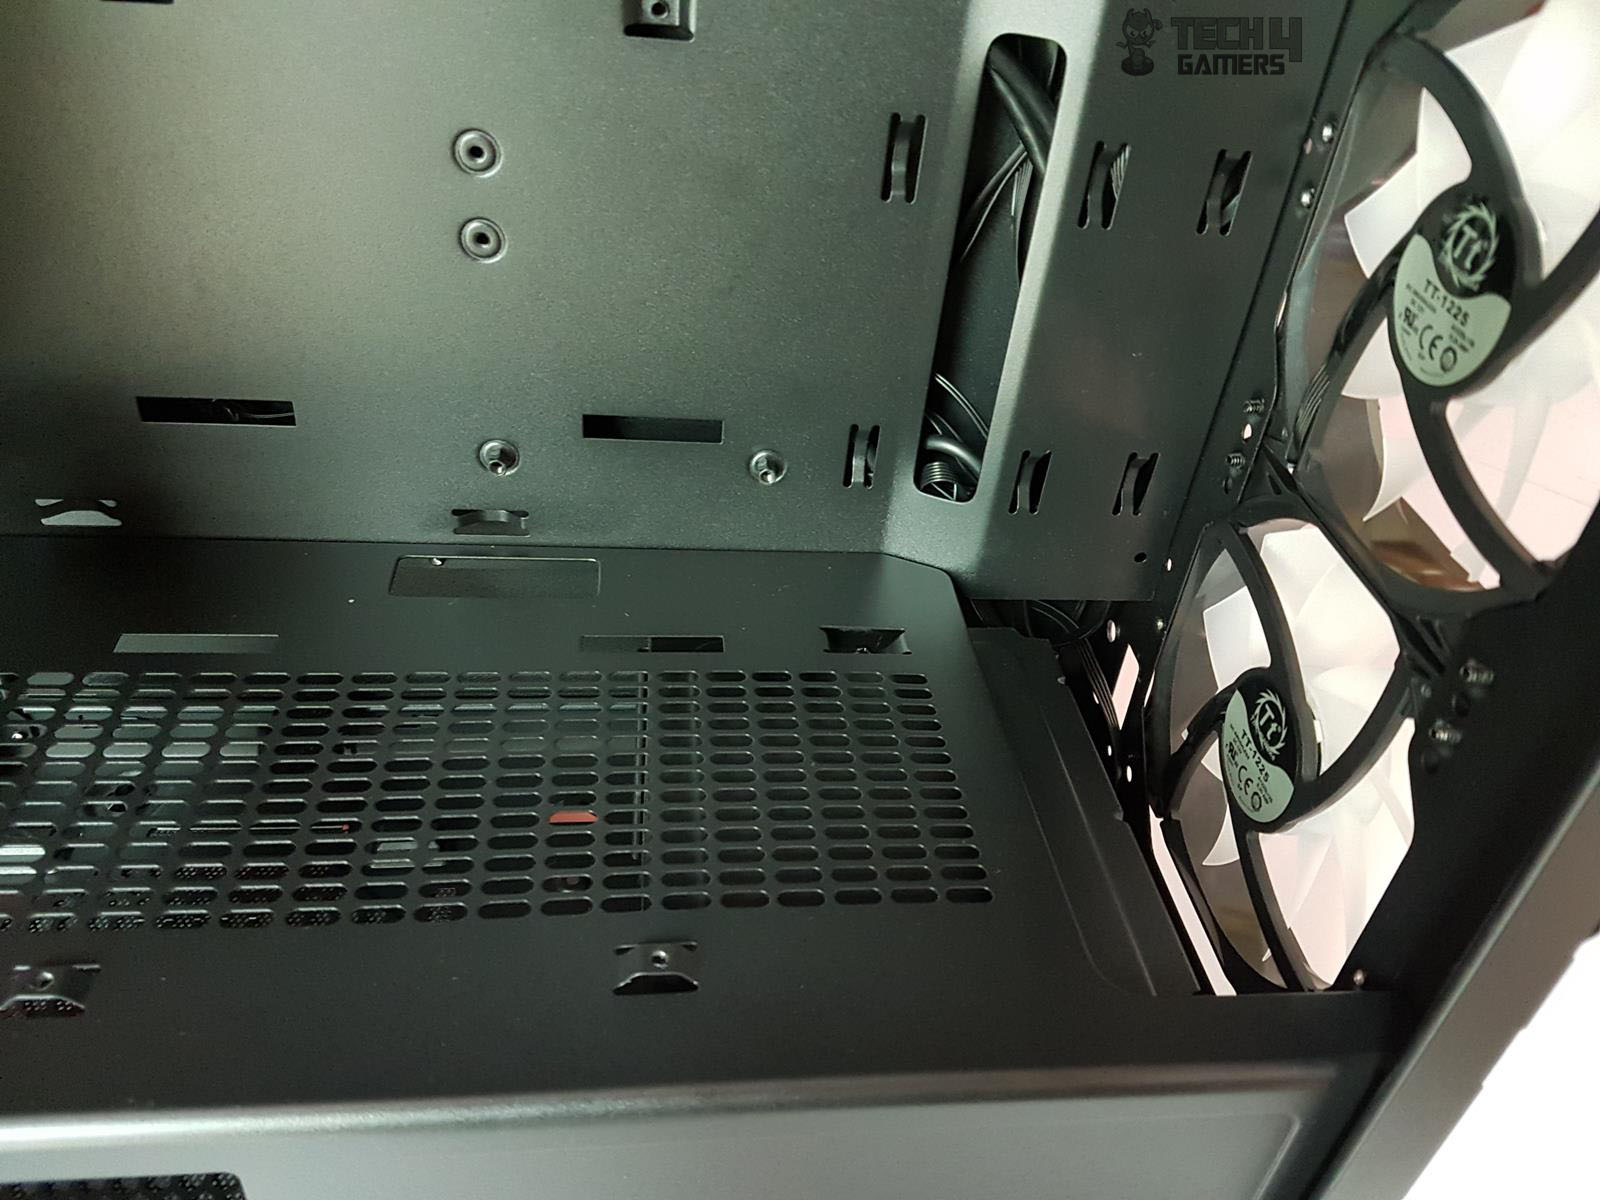
There is a single 120mm black color pre-installed fan on the rear. It has 1000 RPM at 16 dBA. It is not an RGB version. The PCIe slot covers are in the same plane of the chassis frame. The narrow gap between the chassis frame and the slot covers makes the installation/removal of the graphics card tedious. This chassis has support for up to 330mm length of the graphics card and up to 160mm in CPU cooler height.
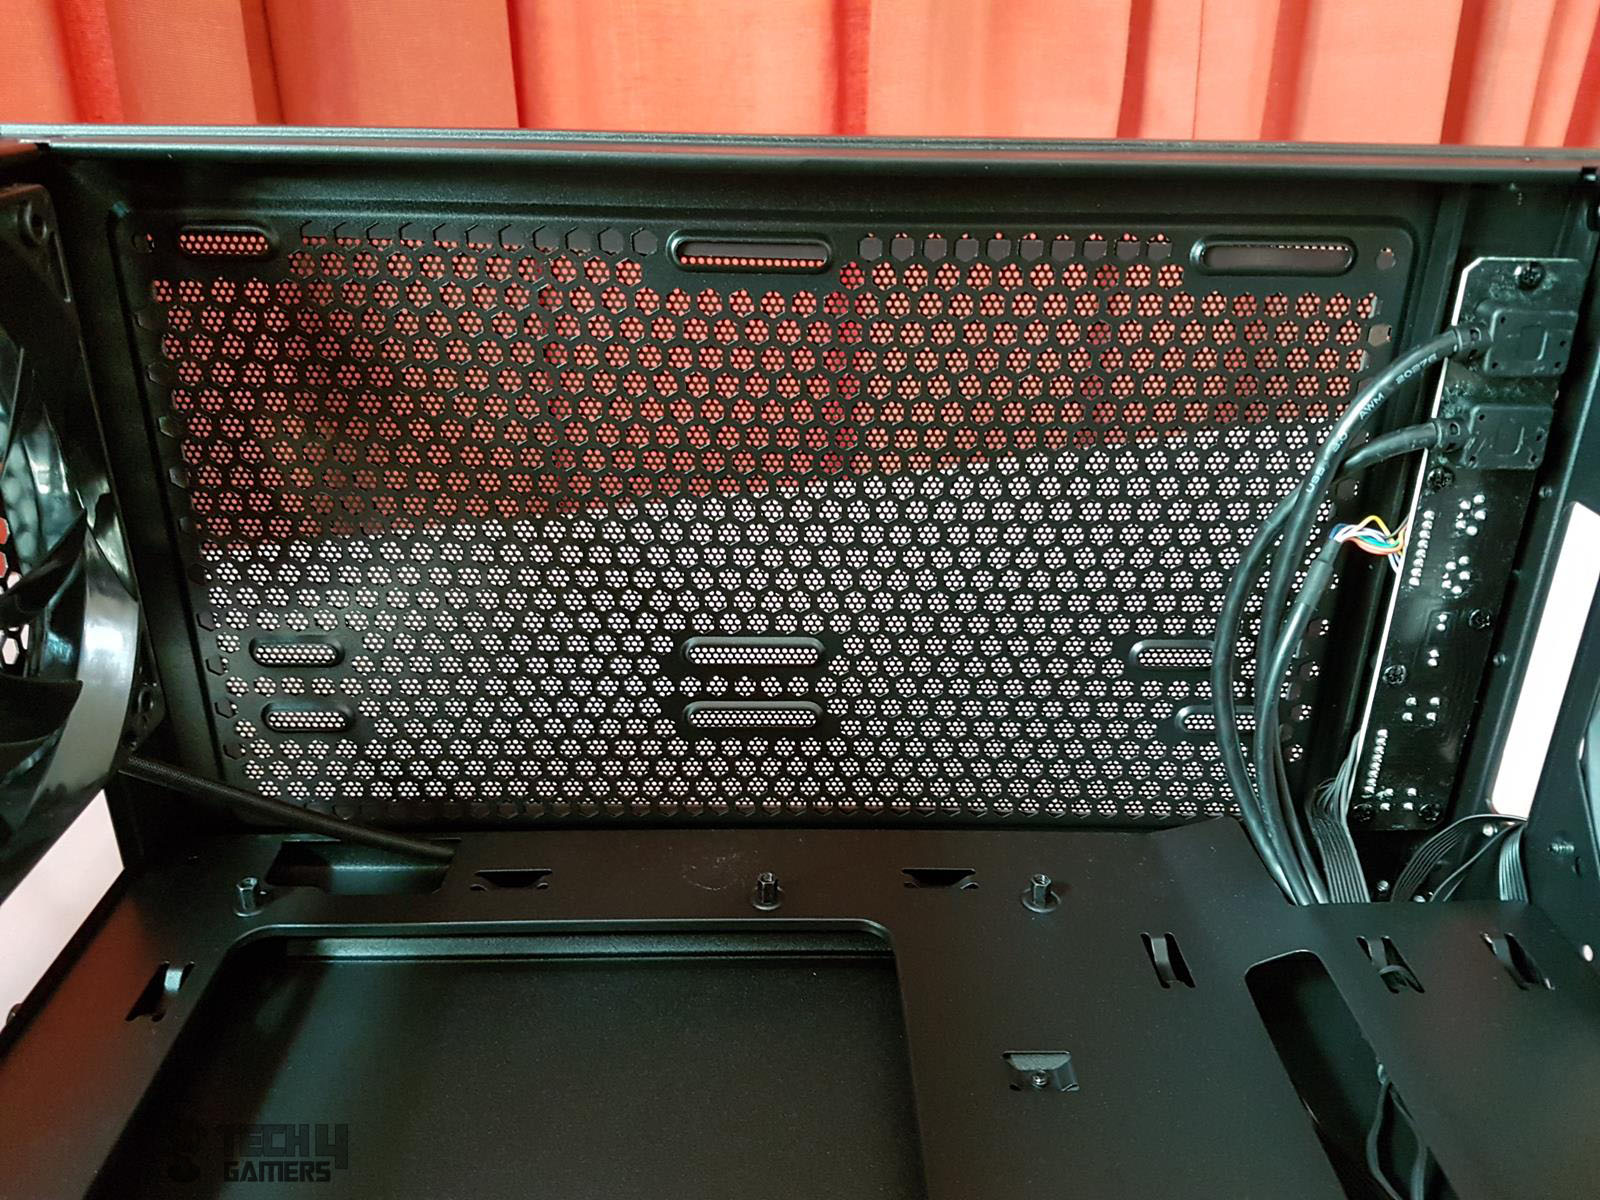
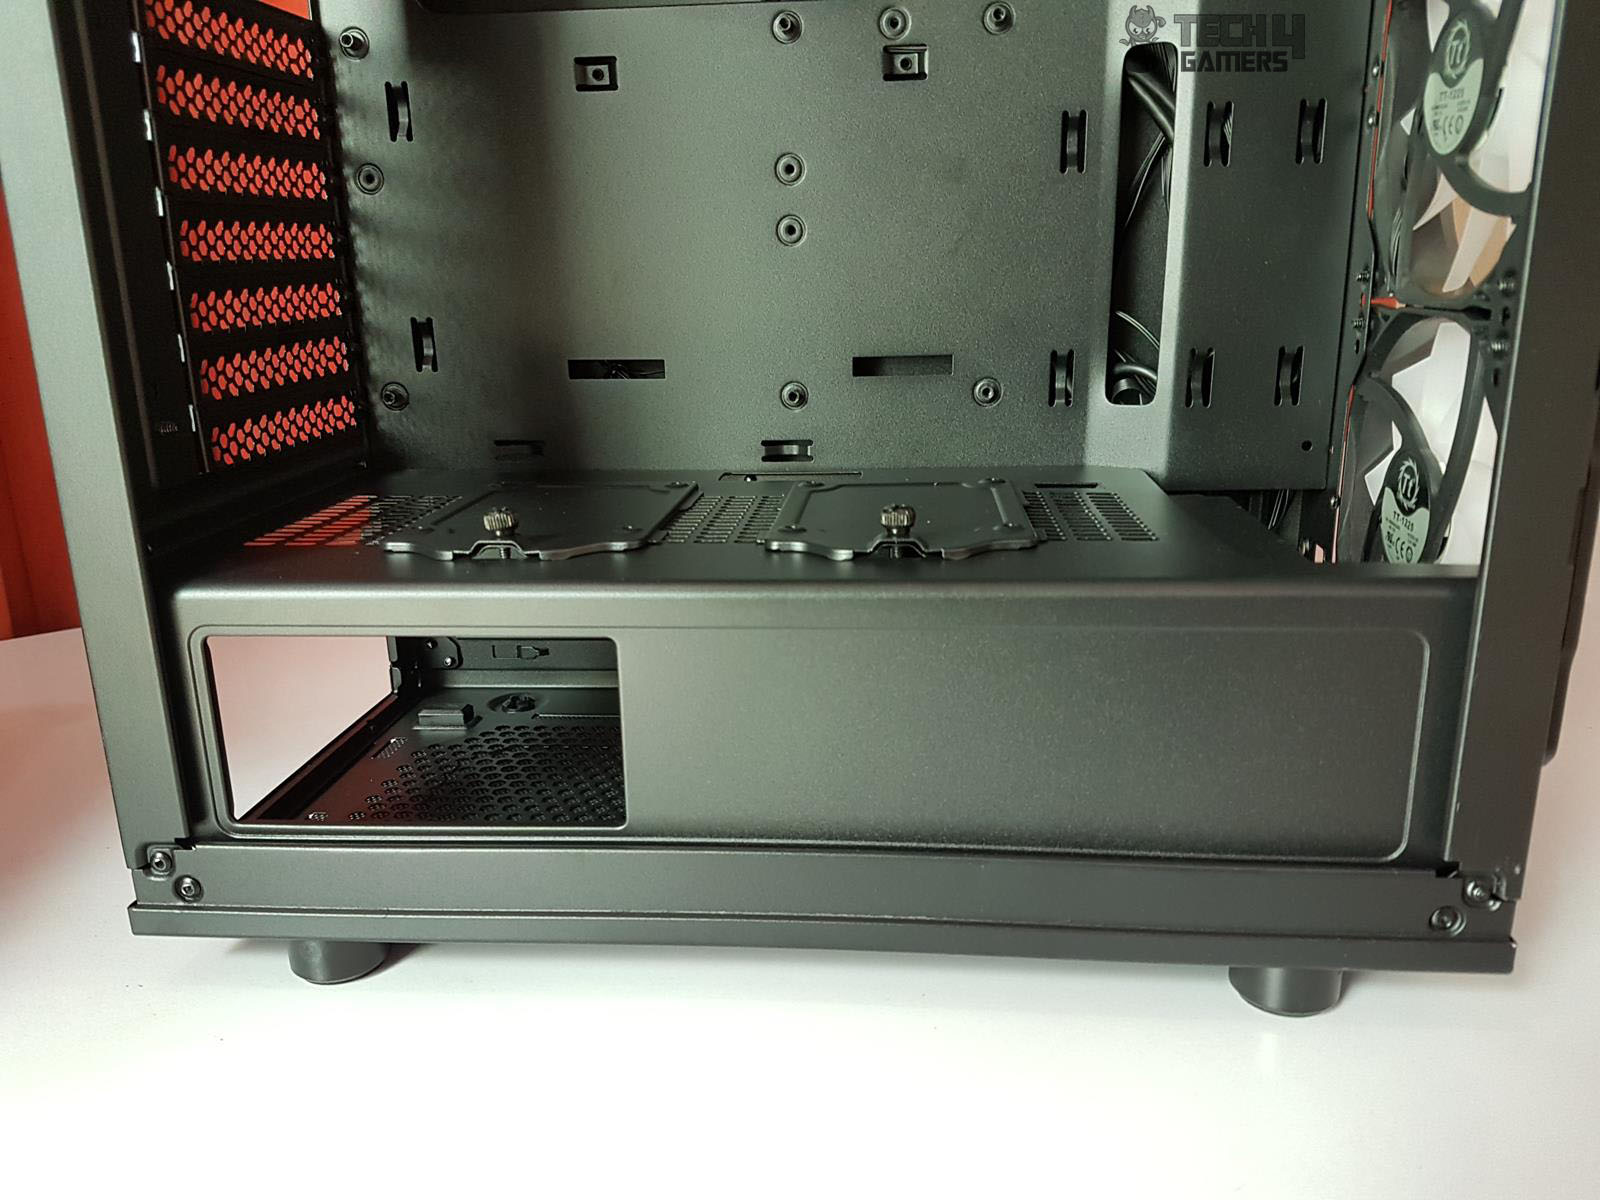
There is a PSU shroud running across the length of the chassis. There is a cutout on its left side to show the PSU. The rest of its surface facing the tempered glass is solid. Its top side has a perforation on the entire length for ventilation.
The backside of the front-mounted fans can be seen. There is a large size cutout on the top right side of the tray from where the I/O panel’s cables are routed.
There is a gap of approximately 62mm between the shroud and the front side of the chassis. The HDD cage, in its default position, is, occupying 22mm of this gap, leaving a 40mm gap for the radiator only. This could have been well 60mm, but for that, we would need to shift the HDD cage behind, which may give us some space on the front, but it will take out space for the PSU, and 160mm PSU is already a tight fit with all the cables.
I am mentioning these aspects so that you can plan your build better. There is no space between the shroud and the side frame of the chassis for any LED strip.
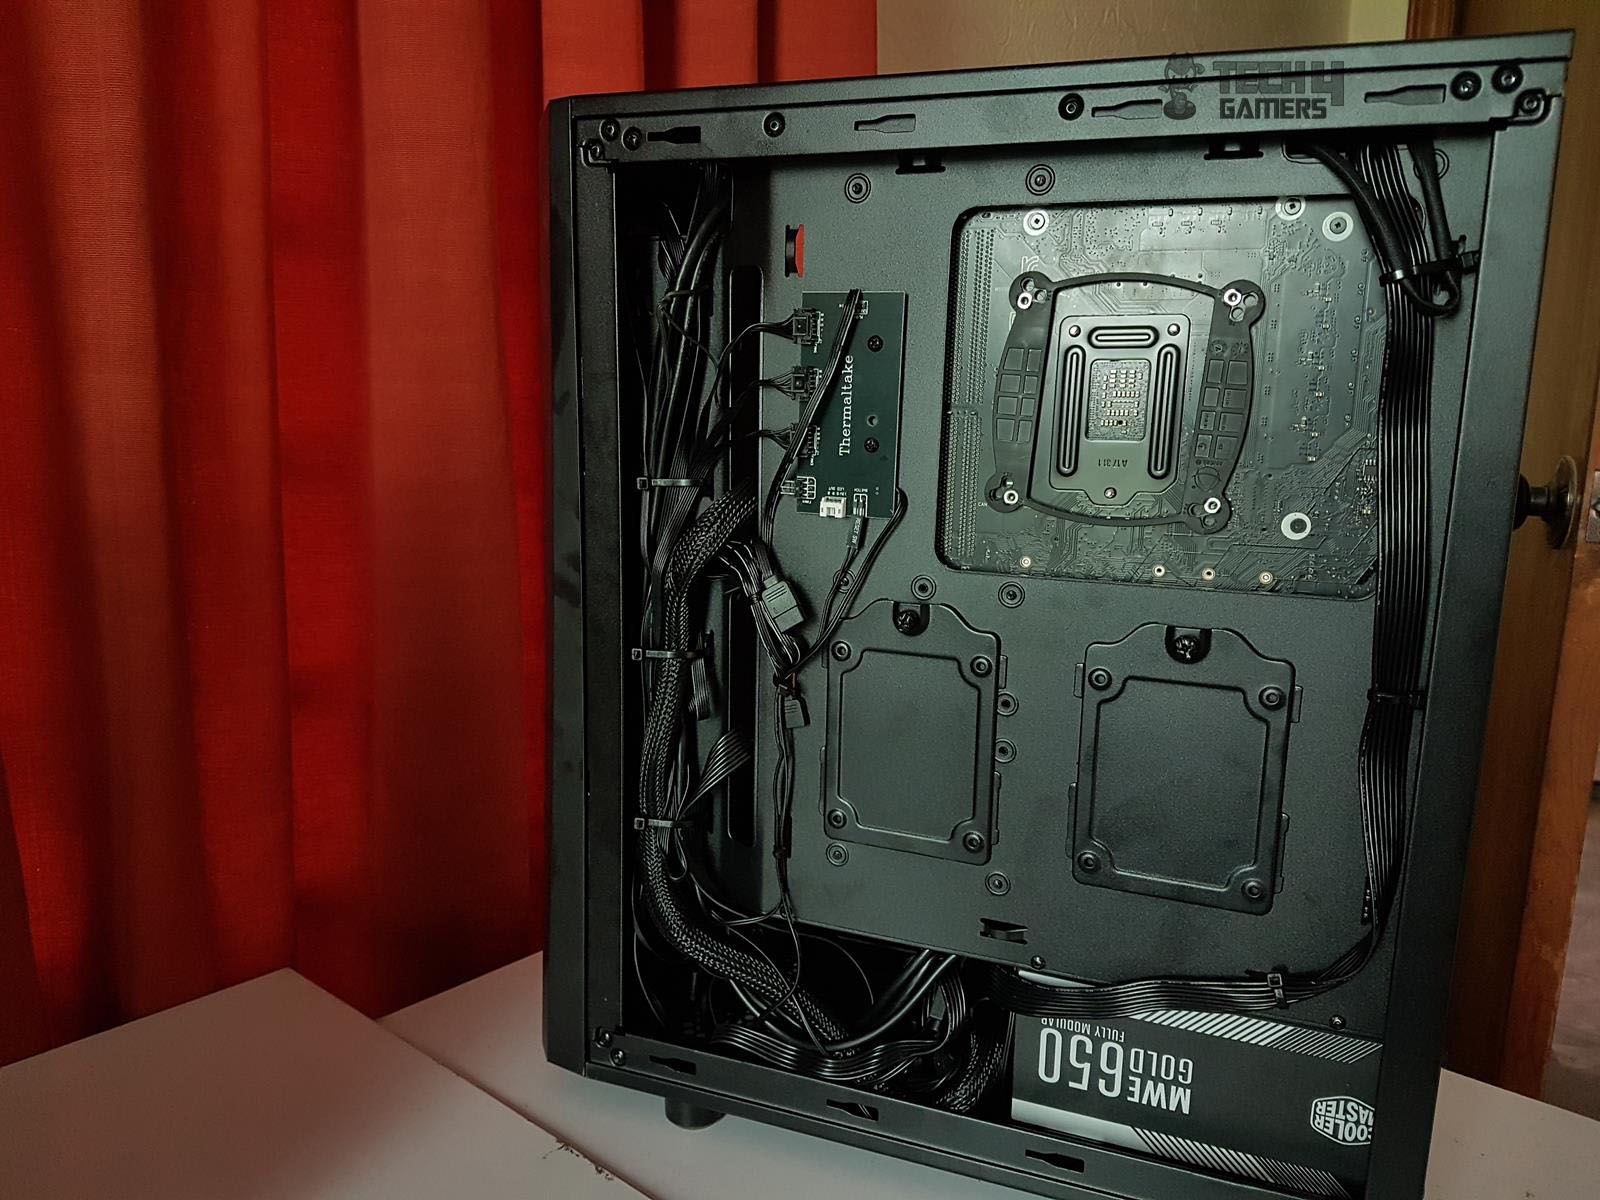
It is time to take a look at the right side of the chassis. As I have mentioned above that the motherboard tray is recessed from the left side (looking at it from the right/back side), this creates room on the left side for better cable management. We have approximately 24mm of cable management space available there. We have 18 cable tie points. There are 8 such points in a group of two located on the left side. The idea is clear, route a maximum of cables from this area. We have approximately 13mm of spacing for cable management elsewhere.
The mounting points for 2.5” SSD brackets are located right behind the motherboard tray. At the bottom, we can see an HDD cage which surprisingly has only two caddies where I was expecting three. There is a space of 190mm for the PSU and its cables. One thing about the raised feet for the PSU is that these don’t have anti-vibration rubber pads on their top, which is surprising.
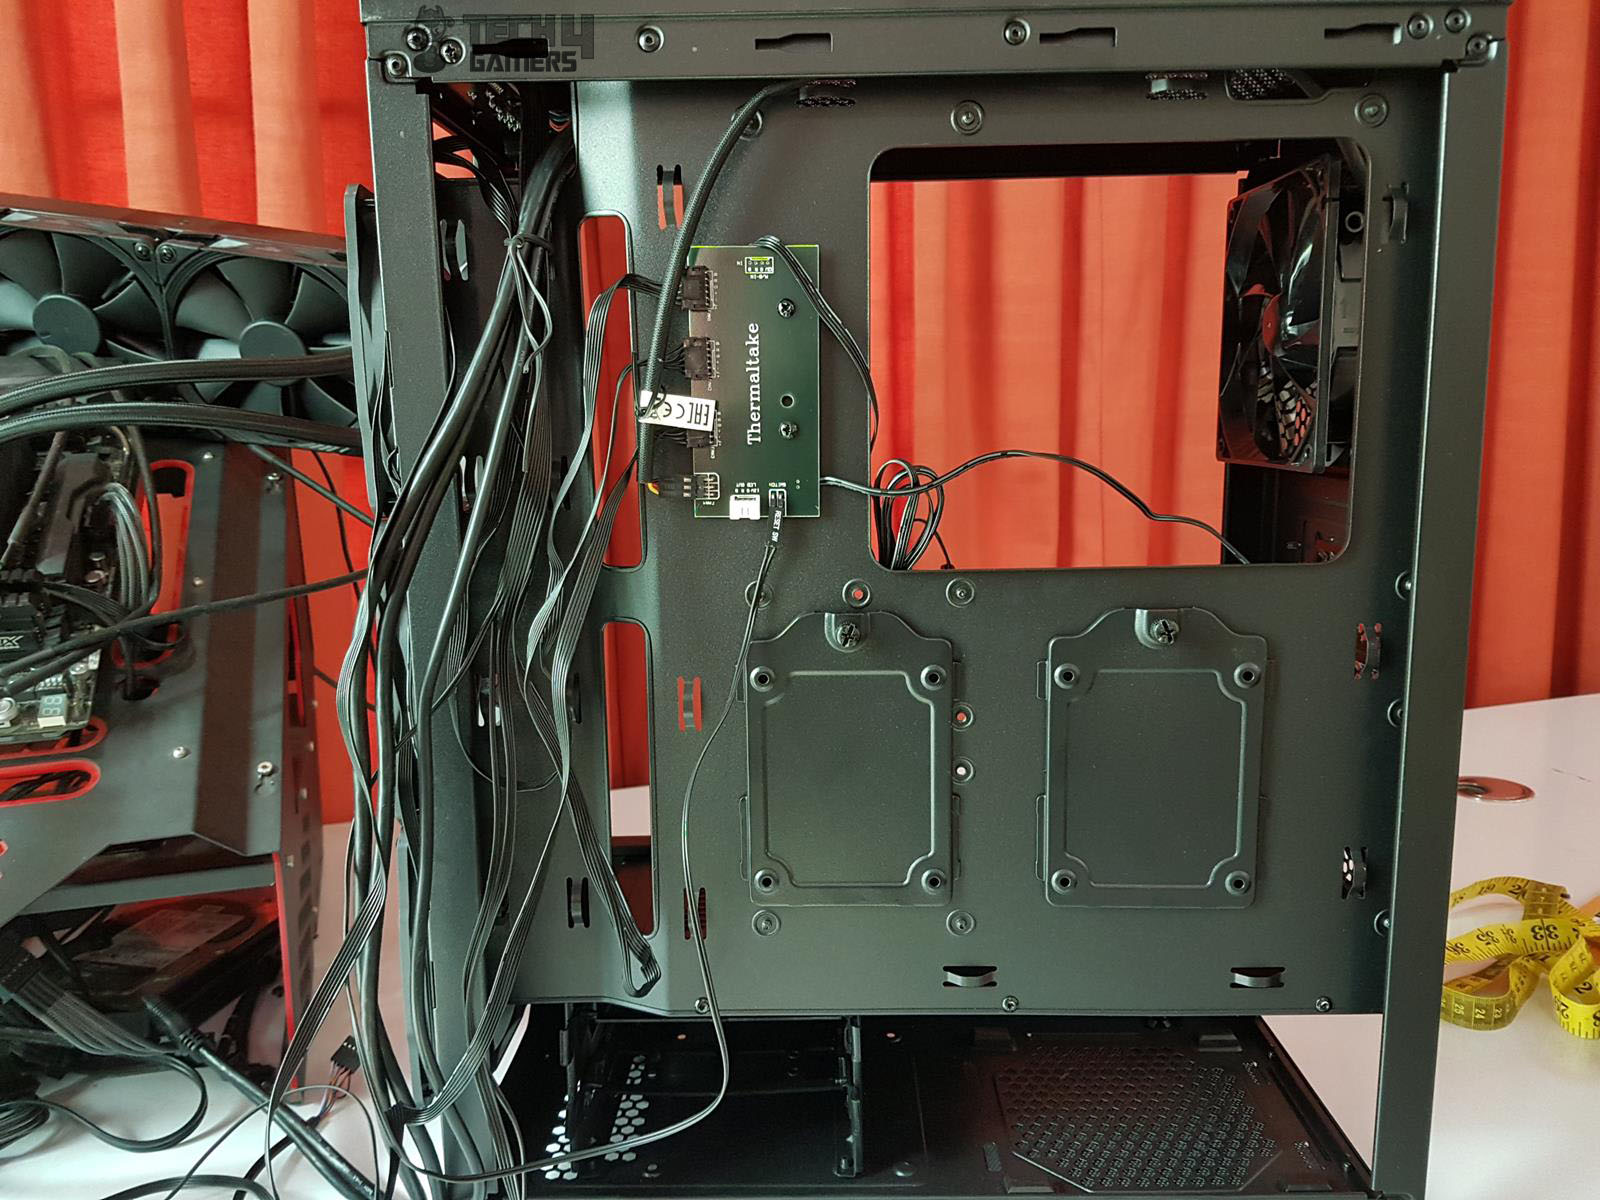
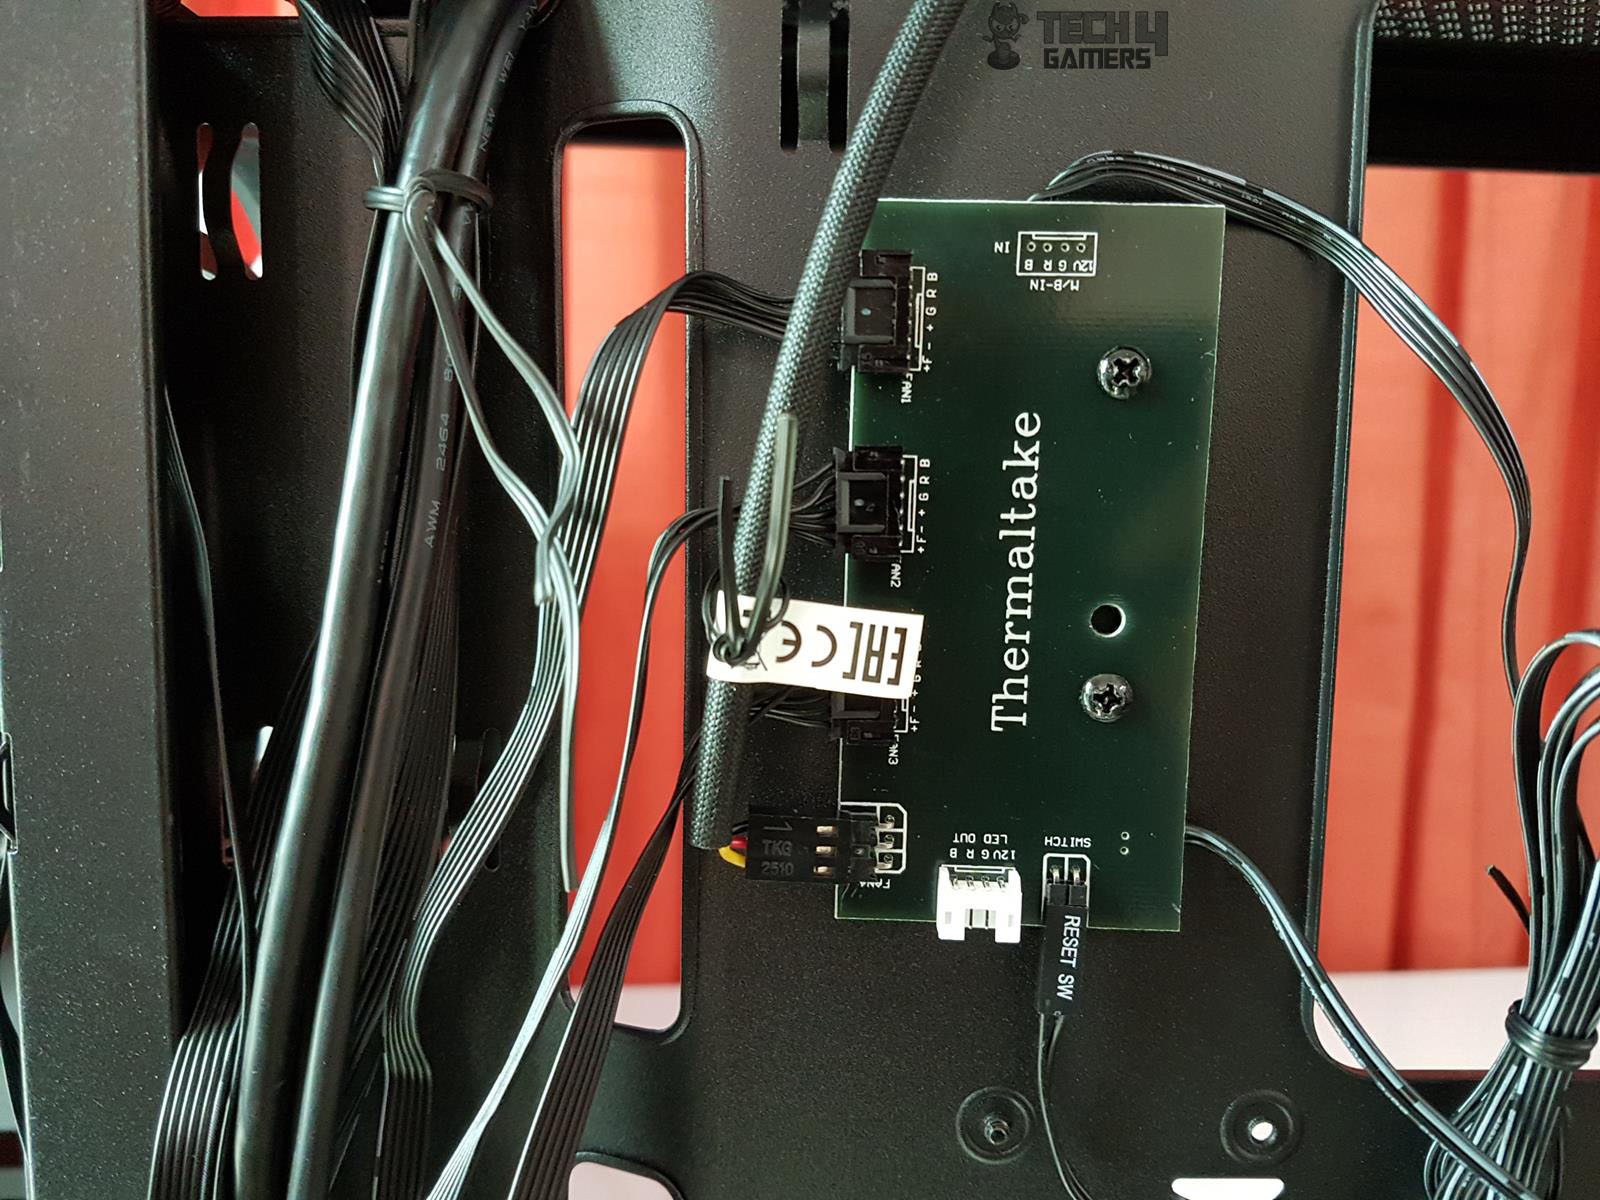
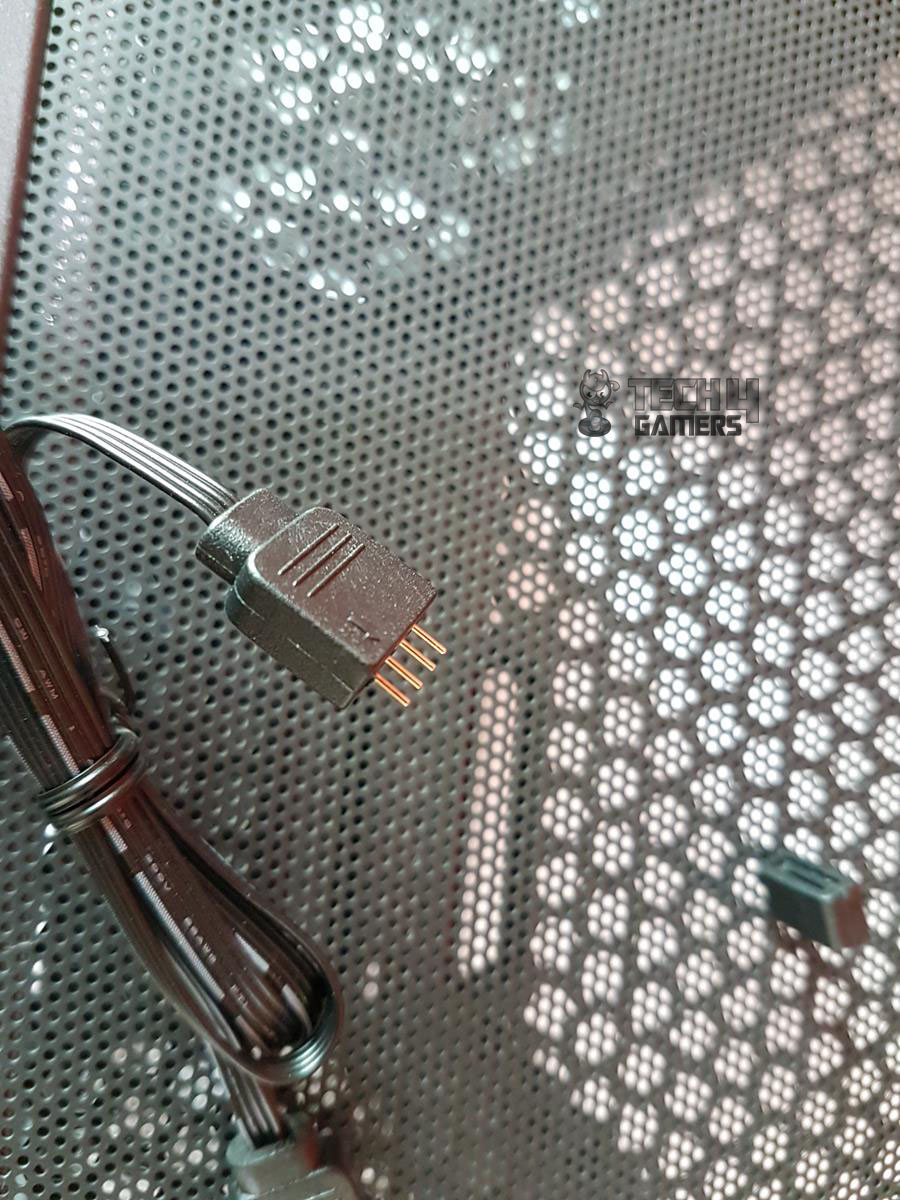
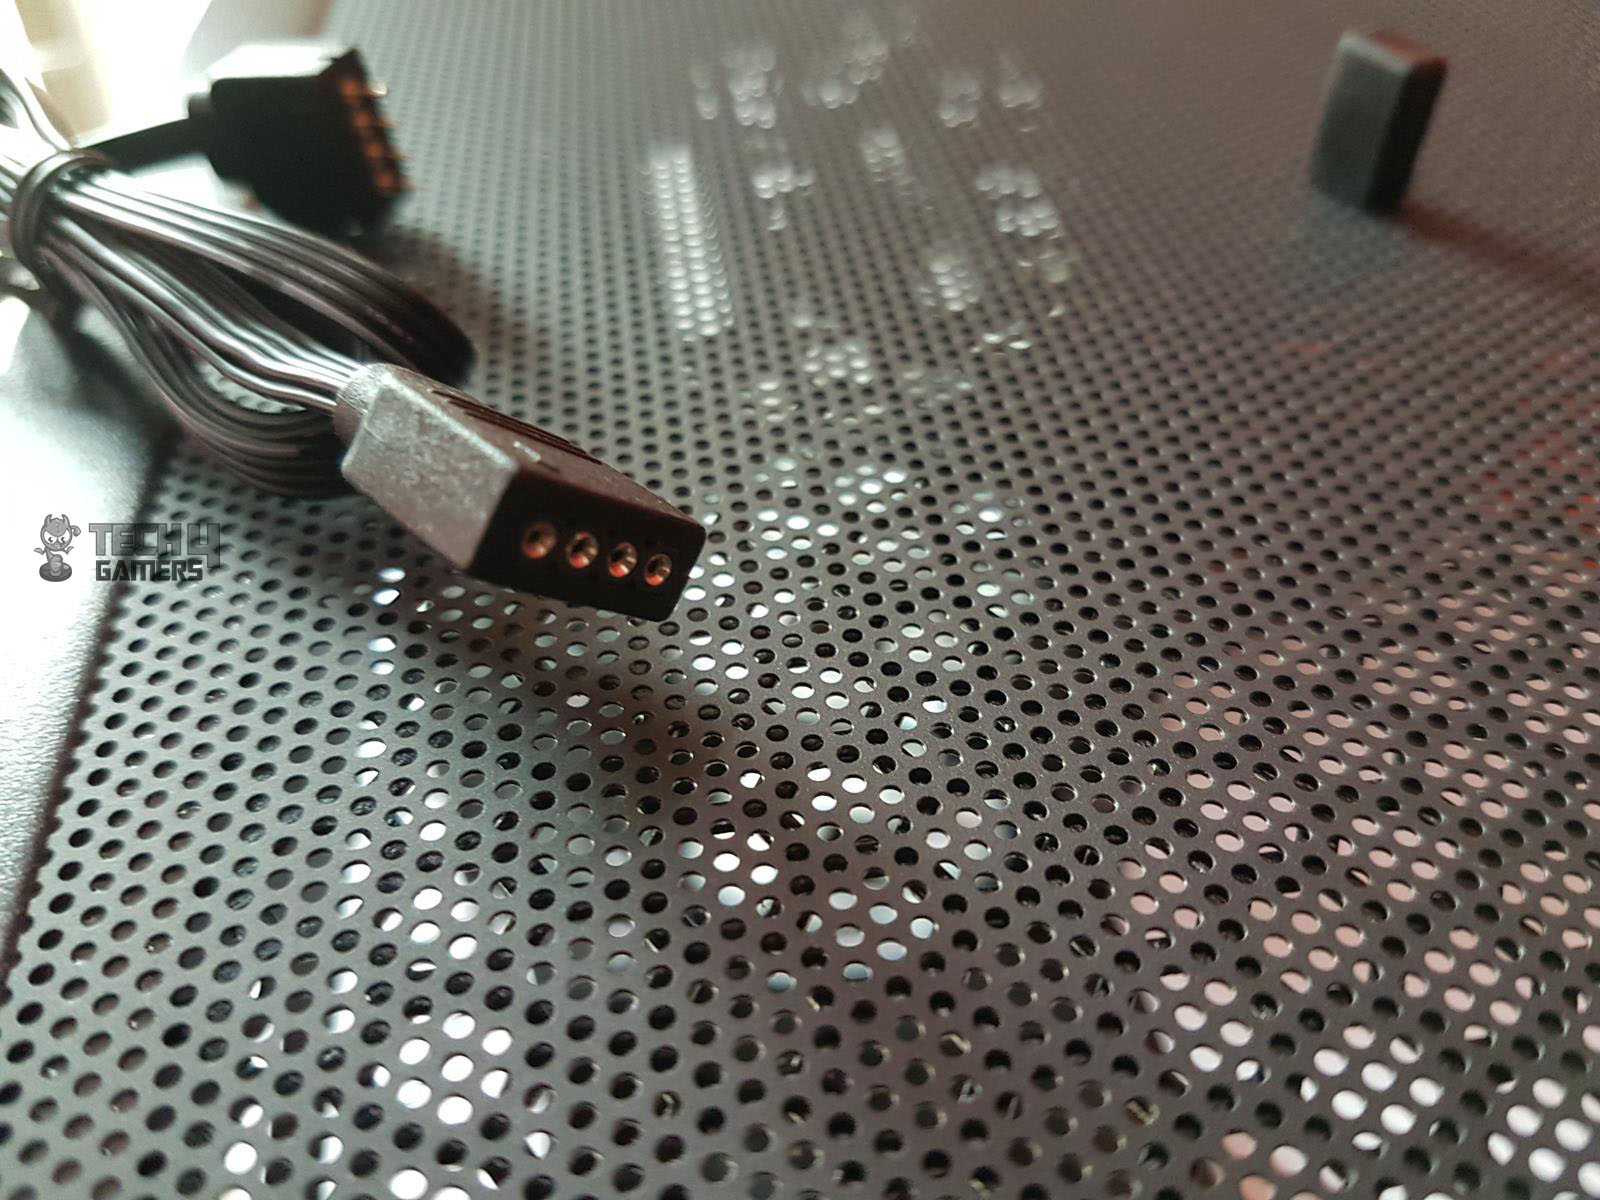
There is a built-in RGB switchboard in black color located on the backside of the chassis. There is a motherboard sync cable coming out from its top. At its bottom, we have a two-pin port on which the Reset cable can be plugged in to control the lighting modes. Also there is a LED out port as well, allowing the user to connect RGB LED strip to the board. The left side of the board has three 6-pin headers for controlling the lighting of the front three fans.
We can’t control the speed of the fans connected to this board. There is a 3-pin fan header to which the rear fan is connected. The user can either use the Reset button to control the lighting of the fans or connect the board to the motherboard lighting header like AURA Sync from Asus, RGB Fusion from Gigabyte, Mystic Lighting from MSI, Polychrome RGB from ASRock, and Biostar LED DJ. Thermaltake has upped its game when it comes to controlling the lighting on this chassis.
RGB LED Lighting
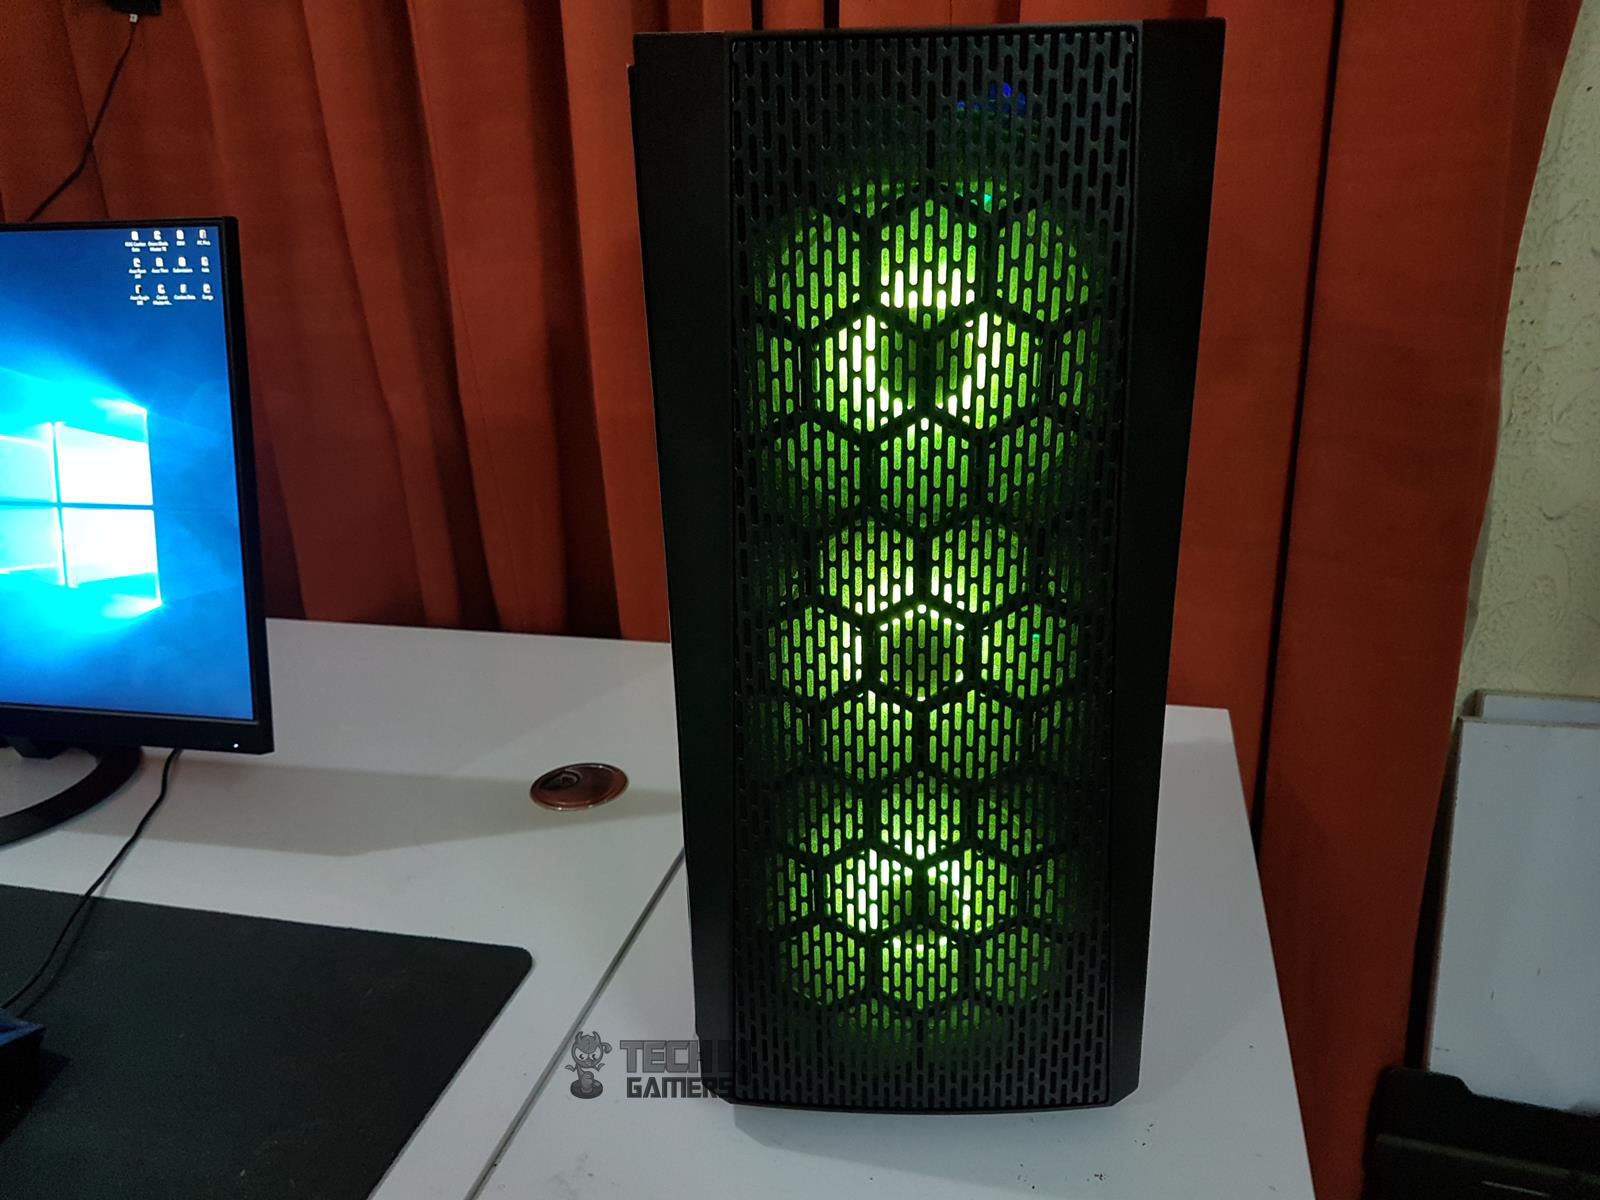
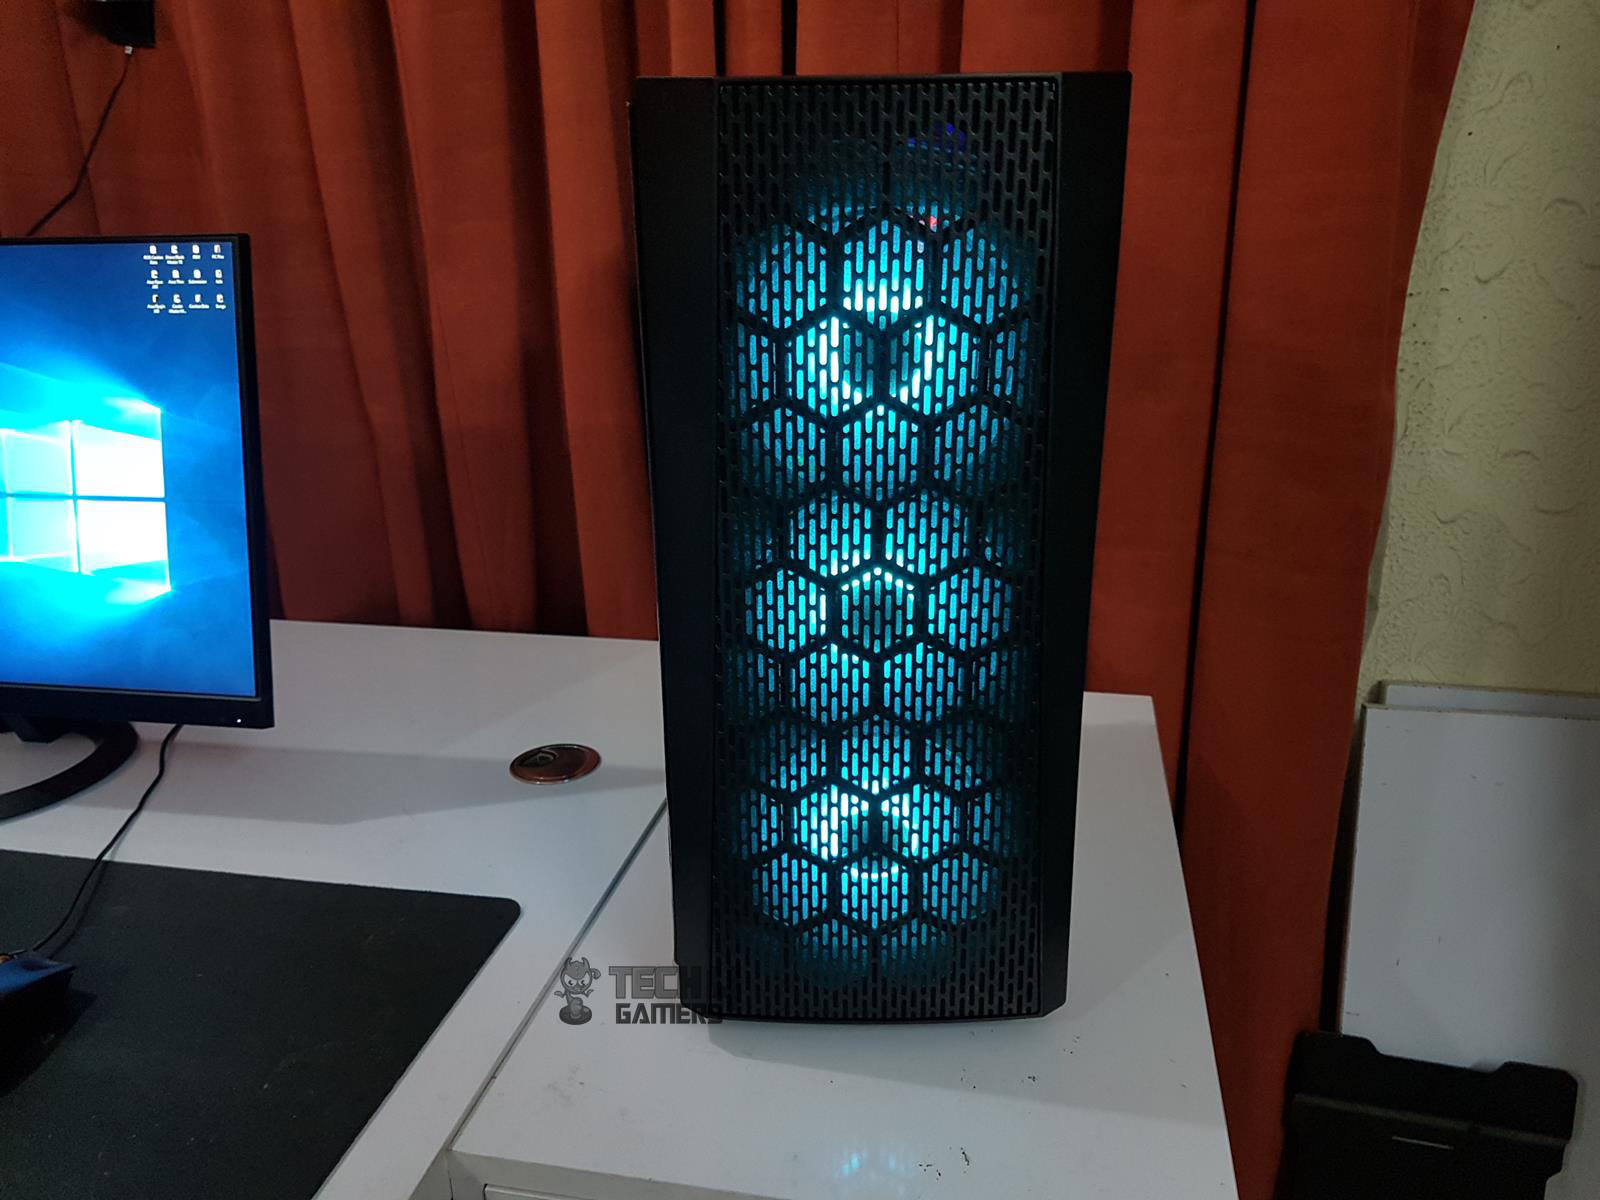
With the chassis design discussed at length, it is time to take a look at the RGB lighting solution. We have a total of 3 120mm RGB LED fans pre-installed on the front side of the chassis. We have a total of 16 modes on these fans:
- Mode 1: RGB Lighting.
- Mode 2-8: Static colors (Red, Yellow, Green, Cyan, Blue, White, Purple)
- Mode 9-15: Breathe mode (Red, Yellow, Green, Cyan, Blue, White, Purple)
- Mode 16: Turns off the lighting
Please, note that Thermaltake is using the 6-pin proprietary connector on these fans. Hence, the user has no control over the speed of these fans. Press and hold on the RGB button (Reset button on the top I/O panel) for 3 seconds to switch the control from the built-in board to the motherboard. Make sure to connect the motherboard sync cable to the enabled header on the motherboard. The fans will blink red twice, indicating that from onwards, they will be controlled from the motherboard.
Here are some pics for your eye pleasure.

Building/Installation
Following is the configuration of the test build:
- Intel i7 8700k
- Thermaltake Water 3.0 120mm CPU Cooler
- ADATA XPG Spectrix D41 2x8GB @ 2666MHz
- Gigabyte GTX 1060 6GB Gaming G1
- Samsung 256GB PM961 SSD
- Cooler Master 650W MWE
Installation was a breeze in this chassis. I started with the motherboard and, after its installation, installed the CPU cooler. The Thermaltake Water 3.0 120mm AIO was used in the test build. It was installed on the rear of the chassis with the black one that came with the chassis. Hence, in doing so, the testing was done on the stock fans. Then, I tried to install the Thermaltake ToughPower 750W RGB PSU, but it could not be installed as its length is 180mm, and there was no room for the cables.
I wish they had made the HDD cage a removable one. Then, I routed the USB 3.0, HD Audio, and front panel connector cables through the single cutout on the PSU shroud and connected them with the motherboard. Afterward, the EPS cable was routed, which gave me a tough time for the reason I have already mentioned above. A tip here is to pass the EPS cable before installing the motherboard.
Afterward, the graphics card was installed, and the remaining cables were connected, which were a 24-pin ATX cable and an 8-pin PEG cable. Rest, I did some cable management and did not face any issues with respect to the cable handling. Mind you, the PSU that I have used is fully modular. The test build came out clean and nice, and this exactly represents what Thermaltake is trying to achieve with this chassis, i.e., clean and sleek. Here are some pictures of the build:

Testing
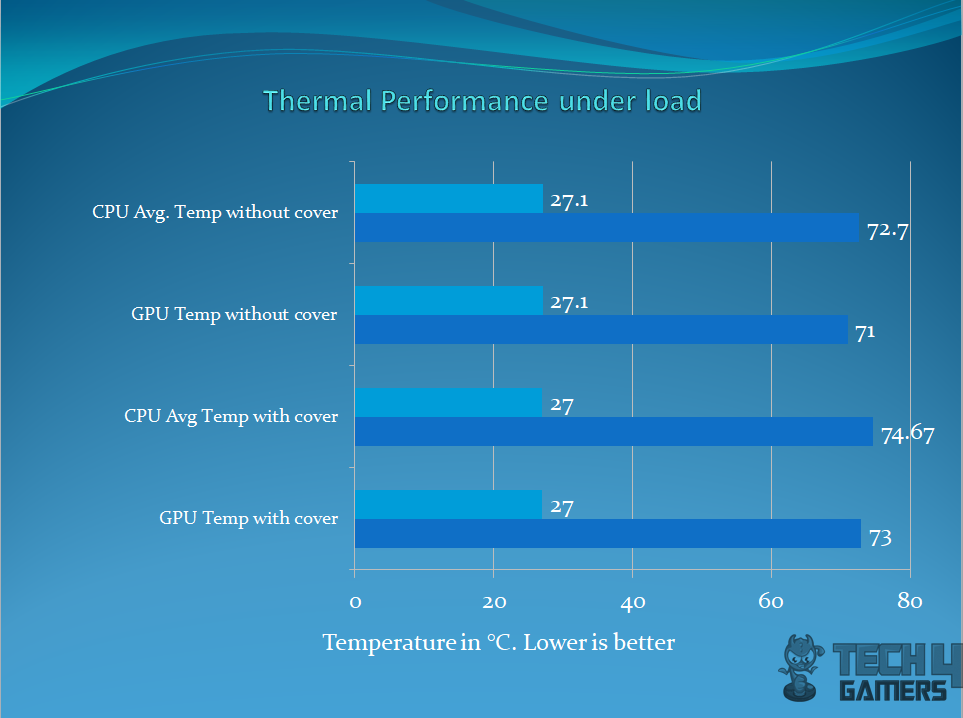
To test the thermal performance of the chassis, the CPU was set to run at 4500MHz, and AIDA64 was used to stress it for 30 minutes. The average of all cores temperatures was calculated. The system was left idle for another 30 minutes, and then Furmark was used to stress the graphics card for 30 minutes, and the maximum temperature was recorded. These tests were done with the front panel on were repeated with the front panel removed.
My testing is showing that there is a difference of approximately 2°C with the front panel on/off, which goes to show that the thermal performance of this chassis with stock fans and front panel on is indeed good.
It is still summertime here, and there are certain environmental noises that are beyond my control; hence I did not measure the acoustics of the completely assembled PC. But based on our testing, the build was silent.
Conclusion
The Thermaltake Versa J24 is available in three editions; Versa J24 TG, Versa J24 TG RGB, and Versa J24 TG ARGB. I got to review their J24 TG RGB edition. It is a compact mid-tower pc chassis with no frills and no-nonsense design but a focus purely on functionality and form.
Thermaltake is aiming at mid-range budget users to get their hands on the near-perfect chassis for the ultimate PC building and gaming experience with a nice blend of Tempered Glass and Mesh paneling as well as the RGB lighting for which Thermaltake has gone to lengths to pre-install 3 12V RGB fans on the front and one non-RGB black color fan on the rear. There is a nice PSU shroud as well, with a provision for installing two 2.5” SSDs on top of it. The chassis has clearance for the CPU Cooler’s height of 160mm, graphics card length of 330mm, and PSU length of 160mm.
In terms of the cooling department, the user can install up to 3 120mm fans or 2 140mm fans on the front or a 120/240/360mm radiator on the front. The user can install a 120mm fan on the rear and a 120mm radiator on the rear. The user can install up to 2 120mm or 2 140mm fans up top with no provision for any radiator on the top. There is no 5.25” drive bay should you be looking for this information.
In terms of the storage department, the drive cage can be used to install 3 3.5” HDDs or 2.5” SSDs or a combination in addition to the two 2.5” SSDs that can be installed on the dedicated brackets. These brackets can be placed on the top of the PSU shroud or behind the motherboard tray. Standoffs are pre-installed, and there is no marking for MicroATX, mini-ITX, and full ATX-size motherboards. This chassis can accommodate up to full-size ATX motherboard though E-ATX is also possible.
The chassis has 7 PCIe slot covers which are meshed and reusable. They are in line with the chassis frame, and there is a narrow gap between the frame and the slots, which would make the installation/removal of the graphics card difficult. Thermaltake has provided a dedicated bracket/holder for the PSU. The user is supposed to install the PSU onto this holder and slide the PSU through the cutout on the rear bottom of the chassis, which then is secured using 4 screws with the frame of the chassis.
There is a dust filter on the PSU intake at the bottom, but it is hard to put it back on once removed. There is a magnetic dust filter on the top. The I/O panel is on the top side of the chassis and has two USB 3.0 ports, audio jacks, LED indicators, and a single large-size button with P and R printed on both extremes. Don’t press this button from the middle, as that will shut down the PC. Operate this button from its extreme sides. R is set to control the lighting modes as it is connected to the built-in switchboard.
This switchboard has a provision for connecting up to 3 fans for the RGB lighting and powering the fans. The switch takes power using the SATA cable. The user can also connect an RGB LED strip to this board. A single 3-pin fan header is also provided. The board has a motherboard sync cable using a +12V GRB pin format. The user can either control the RGB fans using the enabled motherboard’s lighting header, like Asus AURA Sync, or use the onboard switch to control the lighting aspects.
The RGB fans have 15 modes in total with 7 static colors Red, Yellow, Green, Cyan, Blue, White, and Purple. Mode 1 will switch to the RGB lighting (no rainbow), and Mode 2-8 will switch to the static colors one by one. Mode 9-15 will switch colors in breathing mode one by one. Mode 16 will turn off the lighting. At the time of the review, the pricing is stellar for a chassis of this sort with so many features, good looking, and coherent design. This chassis is worth your bucks.

Thank you! Please share your positive feedback. 🔋
How could we improve this post? Please Help us. 😔
[Casings & Motherboards Expert]
Faizan Ahmed is a Computer Hardware Specialist and professional writer covering all the ranges of different PC Casings alongside the latest Motherboards. He is the man to read when you’re buying a casing for your PC, need a Motherboard for your specific processor, or are concerned about the socket or CPU Cooler.
Having a keen eye for the details, his research includes the latest updates and technologies implemented in the sector and the quick response to approaching them ASAP. Before working on Tech4Gamers, Faizan has written immensely on freelancing platforms under the Tech niche, ranging from PC Components to different smart devices, software, and even Game Reviews and Guides.
He’s also written on websites like WhatIfGaming and Mondestuff. Faizan is an early PC gamer, and this prolonged interaction with the PC and Games has made him the perfect candidate for expressing his ideas and concepts in words for others in the community.
Get In Touch: [email protected]


